Wednesday, October 30, 2019

Cricut Project: Samhain: Honoring Salem's Victims

Last year, I planned to create a "Hallowe'en" shirt that harkened back to the celebration's origins: the Celtic New Year and the thinning of the veil between the worlds. In other words, Samhain.

Living in the United States, it's hard to think of "witches" without thinking of the unjust and oppressive "trials" and executions of those Salem, Massachusetts residents accused of being witches. I decided I wanted a ragged, almost "bloody" Pentacle to symbolize that oppression and loss, words to honor acknowledge those who were accused, and an "honor roll" of those who became, depending on your view, either victims of public hysteria or martyrs for Pagans in the Americas.

My timing was off, and my design not completed until well after Samhain.


At September's Pirate-themed Geocaching MEGA event, I had a conversation with a board game vendor whose wares included AFFLICTION: Salem 1692, a board game centering around those very events. Our discussion inspired me to create the T-shirt I envisioned last year.


I used a slightly larger shirt than usual because the amount of text requires this shirt to be worn untucked. The large amount of text and the wide settings needed to make the text legible at a distance required me to piece those areas section by section, cutting them out with 24" mats.


I used almost two complete (36") rolls of Siser HTV in the (discontinued) color "Peach Fuzz", plus 12" of "Bright Red". Had I used Cricut brand HTV, the shorter roll length (19"-24", depending on color and style) would have probably required three or four rolls of the light color.

Not by any means an inexpensive project, but one I needed to do to honor those who were persecuted largely because they did not conform to their society's norms.

Monday, September 16, 2019

New! Cricut Classes at Michaels (Watchung, NJ)

After way too much hemming and hawwing, I came up with an idea for a new Cricut class which was approved for teaching!

This Sunday (September 22) and again on Thursday, October 3, I will be teaching Make Math Fun With Cricut. Aimed at educators and parents, I'll show you how to use your Cricut Explore series or Maker to create tools to help explain everything from basic shapes through some of the fundamentals of geometry. (Well, sadly, not algebra.) If you're interested, you can sign up here.

For those of you who haven't unboxed your Cricut, been overwhelmed by DesignSpace, or are deciding which Cricut to buy, I will be running a Cricut 101 class on Sunday, October 13. The link to that class is here.

The classes are all afternoon sessions, with both Make Math Fun classes starting at noon, and Cricut 101 starting at 1PM. (The classroom folk decide what time to make the classes; the Math class really needs to be run as an evening session so teachers can attend.)


Tuesday, August 20, 2019

Iron-On Heat Transfers and Smokey Bear

We're of that ilk of people for whom teddy bears are "real" (think: "Velveteen Rabbit" real), and so when we read that Smokey Bear was coming to town to celebrate his 75th birthday, and that there was geocaching involved, our geo-trackable teddy bears got all excited and wanted to do something to celebrate.

They've also been after me for t-shirts for the warm weather. (Donovan usually wears a hand-knit Christmas sweater after Thanksgiving, and a hand-knit Irish Fisherman Sweater most of the rest of the winter, while Lambie wears a hand-knit Maple Leaf sweater, celebrating his Canadian heritage (we found him at a gift shop in Halifax, Nova Scotia. Donovan started life as a Boyd's Bear with a renfaire mission, traveling with us from Renaissance Faire to Renaissance Faire, usually dressed in 1570s-era Spanish Court attire.)

The first Smokey 75th graphic I saw, attached to the Mid-Atlantic Forest Fire Compact's commemorative Smokey Bear GeoTour passport, was set against a night forest sky. A nice rectangle for something that would look like a "band" t-shirt, and since spokesbears like Smokey are the equivalent of rockstars to the teddy bear world, highly appropriate.


Not wanting to sew an entire pair of t-shirts from scratch, I found Lambie would reasonably fit the top half of a newborn-size onesie. I still would need to sew Donovan's shirt from scratch. Since I was using white fabric, I sized and printed the GeoTour logo on light-fabric iron-on. I also double checked my heat settings: the 400F cotton setting suggested for iron-on was hotter than my original Cricut EasyPress goes, so it was off to the regular iron. (Besides, these shirts were really too small for a heat press.)

Sadly, even with the higher temperature, the transfer looked incomplete and extremely washed out.


Additionally, Donovan's shirt was a bit tight, the neckline a bit feminine, and the sleeves too long.

Donovan (left) and Lambie in their original Smokey Bear T-shirts

So I recut Donovan's shirt, reprinted the graphics on dark-fabric iron-on, and went from there. Meanwhile, my sister's trackable bear Mink (and his sidekick Del Sol) needed to garb out as well. Mink is tiny enough that the best I could do for him was a singlet with a version of the official Smokey Bear 75th birthday logo. Del Sol, even smaller, could only manage a superhero-style cape. And so the bears were now ready to party with Smokey Bear.

The bears explore the photo props at Smokey's birthday party
Once we decided that we were going to celebrate Smokey's birthday at Liberty State Park, it occurred to me that we should get the people in the household involved in the t-shirt project, just like those families who do Disney parks in matching t-shirts. For this, we chose the official logo (following the proper logo guidelines) for the upper left corner of our shirts, with the geocachers' names on the back along with #SBGT for "Smokey Bear GeoTour". As a non cacher, I refer to myself as a "geo tag-along" and put that on the back of my shirt.


The official color Smokey 75 logo is meant to be produced only on a white or khaki background; all other color backgrounds require a single color white or black logo (logo guidelines here). Since the bears were going to be wearing white, we would wear white also, making it easy to use the color logo.

You may recall from a previous post that iron-on transfers require the "cotton" temperature setting, which is hotter than my original EasyPress will go; I therefore used a regular iron. I tested one of my spare light-color transfers using the iron's cotton setting, and found that even with the high heat setting and pressure, the transfers looked washed-out on a white T. While the white background of dark-fabric iron-on transfers would not necessarily show up on a white shirt, I find that the more superfluous iron-on kept in the transfer, the less flexible the stretchy t-shirt is, and the more like an "iron-on heat transfer t-shirt" it appears. (This is one issue I had with early CafĂ© Press products...)

Of course, I have a Cricut — which means I can use Print then Cut to perfectly (or near perfectly) trim the transfer! On the other hand, the Smokey 75 logo typeface has a distressed look with a lot of open spaces, and the logo itself has some open spaces as well. The third issue is trying to figure out the correct settings for cutting iron-on transfers.

Since there are two methods of uploading a complex graphic to Design Space, I found the key was to upload the image twice: once as the Print then Cut file I wanted to produce, and once as an outline Cut file. In both cases, I removed the white background. For simplicity's sake, I chose to not worry about cutting out the centers of my letters (which I would have needed to do if I were printing the logo for a khaki shirt).

Print then Cut, and Cut only, uploads

To prevent the program from cutting out all those micro-holes, I sized Cricut's basic shapes (mostly rectangles) to match the widths of my distressed letters, and welded them to the Cut-only graphic. After welding out all the tiny distressing holes, I aligned my cut image with my color image, moved my color image to the top, changed my Cut only image to white, and flattened the two layers. This gave me a color image with simplified cutouts (you can see the white that remains where the "5" meets the birthday balloon).

I changed my Design Space background to blue so you can see the effect:


While my images were small enough to fit two to a page, Design Space didn't want to set them up to cut that way. As a result, I needed to duplicate my logo, put the two copies side by side, and Attach them to save iron-on material. Unfortunately, this ended up with some stray cuts through my image. (Fortunately, nothing that couldn't be faked through with the appropriate use of HTV transfer tape... but I'm getting ahead of myself.)

Notice the centers of the "B", "R", "D", and "A" have not been weeded. A white circle behind Smokey was needed to avoid Design Space adding a cut line across the bottom of Smokey's face. The balloon string separated from the carrier paper and is curled up in the upper right of the image.
As you can see from my printed, cut, and weeded sample, my image has a number of separate elements which must be aligned correctly to produce the copyrighted image. As an image printed on opaque medium, the adhesive side is attached to the carrier sheet. I needed some sort of transfer tape to keep my elements aligned for heat transfer. Fortunately, I had purchased a yard of the stuff from Ante Up Graphics, from whom I purchased my "Infinite Galaxy" Siser EasyPatterns® back in June. It's called "Siser TTD High Tack Mask", and it's used pretty much the same way transfer tape is used for adhesive vinyl projects.

Using the TTD High Tack Mask is not without its own issues. Like the carrier for normal HTV, the material is not as impervious to heat-press temperatures as I'd like it to be: it warped for almost every project I've tried it on, occasionally releasing an improperly-adhered (or non-adhered) design element, and iron-on ink sticks to it and comes off on the next project.

In the end, all of our Smokey Bear 75 garb was a hit, and the three people had as much fun as the four teddy bears did geocaching and chasing down Smokey for pictures.

Smaller 75 logo on Lambie's sleeve

Donovan and Lambie look for a geocache
More Geocaching

The bears meet Sparky the Fire Dog

Me, Smokey, and the Teddy Bears


Friday, August 16, 2019

Thoughts on Mixing Iron-On Transfers, HTV, and Patterned HTV

For a recent set of t-shirt prototypes for my STARFLEET chapter, I needed a detailed print of a STAR TREK starship, STAR TREK-style lettering, and something to create a starfield background.

It was obvious at the start that I would need to use Print Then Cut on standard iron-on transfer sheets for the starship. I wanted to see if I could use "light" (see-through) iron-on transfer sheets on top of white Siser EasyWeed® Electric Heat Transfer Vinyl to create a metallic effect, or if I would need to use the solid-white iron-on transfer sheets meant for dark fabrics.

While the 6.5" x 9.25" bounding box Design Space requires for registration limits the size of my image, basic geometry tells me that if I angle the image to use the top corner of the box on one side, and the bottom on the other, I should be able to Print Then Cut an image greater than 9" in its long dimension. Unfortunately, no matter what orientation I set my starship, or what angle I saved and resaved it at in Photoshop, Design Space insisted on placing it on a vertical or horizontal axis and telling me it was too large for Print Then Cut. I ended up having to edit the orientation again in Mat View in order to print my images at something approaching my desired size.

Once I got my graphic in the correct size and orientation, I used a rotated version of it to create a "knockout" against a desired circular "star field" of either "Galaxy Black" Siser Glitter Heat Transfer Vinyl or Siser EasyPatterns® Heat Transfer Vinyl in "Infinite Galaxy" (that is to say, I delayered my text and images from my background).

Then I printed and cut the color-enhanced line-art starship from both dark-fabric and light-fabric iron-on transfers. I also cut the outline from "Pearl" (metallic white) Siser EasyWeed® Electric Heat Transfer Vinyl to place under the sheer "light fabric" transfer. I also cut the rest of my graphics (round "star field", chapter name, NCC number, "stardate" established, URL, and What 3 Words location)

Unlike most other heat transfer vinyls, Siser EasyPatterns® is cut from the "right" side of the vinyl, and is transferred to the surface to be ironed by a special vinyl transfer tape that is supposed not to be the same as the transfer tape used for adhesive vinyl.  I decided to try to use this transfer tape to position and iron on not just the EasyPatterns vinyl, but the dark fabric iron-on transfer as well.

The two prototypes I ended up with were purple (chapter's main color) with the "Infinite Galaxy" pattern for the star field and (if I recall correctly) the dark-fabric transfer for the starship, and navy (another "spacey" color) with "Galaxy Black" glitter for the star field, the white EasyWeed Electric and the light-fabric iron-on transfer for the starship. Both t-shirts used plain white for the lettering.

(Sadly, I didn't take pictures before I sold the one prototype and gave the other one to our chapter president to show off at an upcoming STAR TREK convention.)

It had been a while since I worked with iron-on heat transfers — since before I purchased my Cricut Explore Air and (more importantly) my Cricut EasyPress. Sadly, things didn't work out quite the way I wanted. The light-fabric transfer didn't want to transfer the image properly to the heat transfer vinyl, and the temperatures I needed to place all the pieces together caused the Siser EasyWeed® Electric Heat Transfer Vinyl to melt, and the iron-on transfers to melt a bit as well.

That said, a new design of chapter t-shirt is never an unwelcome thing, and it started us into a discussion of What 3 Words and its possible utility when colonizing an alien planet (hey, we're into STAR TREK, science fiction, and space exploration!)

Given the issues I had mixing the two types of iron-on, I finished the project knowing I'd need to do some more experimentation. Stay tuned for the next installment of "trying to get them to play nice together" <g>...

Saturday, June 15, 2019

Rolling Our Own Craft Tubes

TP rolls, craft tubes, whatever you want to call them — we're showing a number of crafts based on covering empty toilet paper rolls, or using the brightly-colored versions we used to sell in the store. Corporate came up with some instructions to (excuse the pun) roll our own from cardstock. The big issue I have with their instructions is, umm, staples. Not the office superstore down the road, but those U-shaped metal wires that are made to pierce two or more pieces of paper and then get their uprights stamped down into a bow shape (when the machines work properly). Even with the sometimes sharp points inside, these can pose hazards to young hands instructed to stick their fingers inside the tube to glue various craft materials in place.

There's a better way to do this, though it takes a little more time, and a handful of perfectly-reusable Jumbo Gem Clips (standard trombone-shaped paper clips).

Step 1. Cut out your blank form. This is a 7.5" x 4.5" rectangle of cardstock. A paper cutter will give you a more even edge than scissors, but it's not necessary. You could even use fancy-shape scissors on the long edges of the rectangle, to get a fancy top and/or bottom of your tube.


Step 2. Use a bone folder, or a ruler with a sharp (metal) edge, to induce a curl in your rectangle. Hold a short edge of the rectangle firmly in the center. Place the ruler parallel to that edge, as near to it as possible, and at an angle to the table. Press firmly with the ruler and pull the ruler towards the opposite short edge of the paper. This will curl the edge away from the edge you are holding. Turn the paper 180 degrees (so you will now be holding the curled end) and repeat. You may need to do this a couple of times to create enough roll to allow you to roll the cardstock neatly.


Step 3. Use your hands to form a roll from the curved paper. It should be about 1-1/2" in diameter, but it can vary depending on your hands and your needs. This will be just shy of two full rotations of the paper.


Step 4. Place a thin line of white glue along the open edge of the roll. Aleene's Fast Grab Tacky Glue works best, but Elmer's School Glue will do just fine, and it's child safe.


Step 5. Use paper clips to clamp the edges in place until the glue dries. Press down in the center (un-clamped area) to help the glue adhere there as well.


Step 6. Remove the paper clips. Your craft roll is ready to use.


By the way, given the potential for the spread of harmful bacteria, I would not recommend using actual empty toilet paper tubes for crafting.

Friday, June 14, 2019

Mini Cupcakes Need Their Own Wrap!

One of my ongoing challenges with Design Space (and Cricut Access) has been that of creating cupcake wrappers with organizational logos. My issues have been mostly registration issues, where my logo would end up too high or too low, or the Explore Air would not "cut on the lines" of my cupcake wrappers.

Leading into this year's AVENGER anniversary party (I've been a member of the USS AVENGER chapter of STARFLEET, The International Star Trek® Fan Association since its inception, 34 years ago), I decided to tackle the cupcake wrapper issue again — this time using Print Then Cut to get my alignment just right.

Starting with the cupcake wrapper files I had saved in Adobe Illustrator, I moved my wrappers into a space that would fit into Print Then Cut's limitations (6.25" x 9"). I added my logos, then saved the file once as an .svg and once as a .jpg, and uploaded them to Design Space.


While Design Space understood the files, more or less, and could cut on my lines, I could not get it to not cut out the logo, regardless of how I uploaded the file, and regardless of whether I designated the design as Cut or as a Print Then Cut. (The only difference was whether it tried to cut just the outline, or every little color change.)


Finally, I tried something else. I created a second file identical to my logo-bearing file, but without the logo. I added a 4-point-stroke, no-fill rectangle around the wrappers so Design Space would know exactly where to cut.To prevent errant lines, I set the stroke of my wrapper outlines to None in both files. (The downloadable .ai file has hairline strokes so you can see where to place your logos.Select the wrapper outlines and set your stroke to None before printing.) I uploaded the second file as a Print Then Cut file, and loaded it onto my canvas (the project is available on my Cricut profile page). I printed the file from my original (logo-bearing) file, and when I went to Make the wrappers in Design Space, I clicked on the "I've already printed" link to skip printing out a blank rectangle.


I ended up with perfect cupcake wrappers — but I had a number of mini cupcakes, and they needed to be wrapped as well!

Try as I could, I could not find a premade design for mini-cupcake wrappers — so I did what any engineer would do: I ASSumed the two sizes of cupcakes had the same exact proportions, and based on a 3" top versus a 2" top, scaled everything down to two-thirds.


Yes, there's a reason it's spelled ASS-U-ME. When we went to wrap the mini cupcakes before icing them, we found the wrappers were over a quarter inch too tall, and didn't have enough curvature to hug the bottom of the cupcake liner. Well, so much for wowwing folk with the minis at the event — but afterwards, it was back to the drawing board.

The wrapper sticks out the bottom (too tall),
and there is excess space around the bottom of the mini-cupcake (not curved enough)

After a bunch of trial and error, I'm down to something that's about the right length and the right curvature, but if your mini cupcake has any sort of "muffin top", it's still about 1/8" too tall.

Original 2/3 size, interrim rework, final rework
(If it's just filled to the top of the tin, with a very little crown, the design works fine.)


The mini cupcake wrapper is available on my Cricut profile.

Thursday, April 25, 2019

Unicorn Party Hat

One of my colleagues is known for her collection of deely-boppers and headbands; she has at least one for every occasion, and is always collecting more.

While some of our customers suggest I should do likewise, that sort of head decor is not really my thing. My Kitschy Christmakwanzakah Fascinator (with full sets of felt Chanukah and Kwanzaa "candles") is about as far as I'm willing to go.

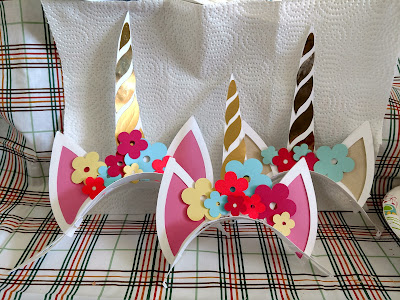
That said, a couple of weeks ago I was tapped to do another "Unicorn Fantasy" birthday party at Michaels. I had recently licensed a number of unicorn and unicorn-related images from DesignBundles.net, and decided that a party hat might be a cool thing to design. After a bit of browsing through the many images in the "Unicorn Bundle" I'd licensed, I decided on one of MStudio's designs from this group: a horn with a pair of horse ears and simple paper flowers. The original design also had eyelashes, but in order to make a headband, I needed to delete them from the image I'd be cutting.

A very large horn (left) before some better-scaled ones
Because I wanted my headband to have some dimensional layering, I had to reconstruct the underlayers from the original design so one could see the entire horn and flowers from both front and sides.

Backer piece, held onto the headband with paper tabs
On the fit side, I needed to add curvature so the design would sit on a human head and attach to a headband to hold it there. I also needed to create a backer for the design elements as well as the headband, and set everything to a reasonable scale. It took several tries to get it right.

I used Aleene's Quick Dry Tacky Glue and Studio G dimensional foam dots (similar to these) in the assembly process: first, manually gluing the horn bits to the back of the design, then the inside ears, then several layers of outside ears, and the top half of the tabs that secure the back to the headband.

(Note: I suggest using paper clips to clamp glued papers together until they dry.)

Side view shows holes for optional elastic.

Finally, the flowers went on with dimensional dots, and the design was ready to try out.


The design for this party hat is on my Design Space profile.

Tuesday, April 23, 2019

Business Card Holder Redux

After looking at the Business Card Holder design I published last month, I realized it would be an easy fix to make it slant backwards in the way we are used to seeing business cards presented. I also decided I didn't like the way the edge of the "holder" piece stuck out over the top, and the way the top corners of the "stand" piece were exposed.

In this edited design, the holder will stand slightly slanted, and the top of the "holder" is scored so that it can be glued across the top of the "stand".

I originally thought to suggest a pair of glue dots to secure the front part of the "holder" to the folded-to-front sides of the "front". As it turns out, Aleene's Fast Grab Tacky Glue is really good on this project, as long as you use paper clips to clamp the glued areas in place until they dry (about a minute or two).

Both of the above links should forward to my projects on Cricut Design Space.

The unicorn-theme paper design was tiled from Krystsina Kvilis (@peace-art)'s "Magical collection of unicorns II" from Design Bundles.net. (I had intended this particular holder for use at a unicorn-themed event.)

Front view (it got a bit crushed traveling)

Side view: slanted versus upright card holders

Oblique view, comparing the two designs

Wednesday, March 27, 2019

Cricut Project: Business Card Holder


This is the edited and completed version of the project I started at this year's Trenton Computer Festival (TCF). It is available on my Cricut Profile Page.

The instructions there are a bit terse, having to fit inside 500 characters. Here's a more complete version:

Supplies:

Preparation:

  • Print an allover design on cardstock (optional)
  • In Design Space, set all text to "not visible" (or just ignore the black mat)

Settings:

  1. Set your materials setting to "Poster Board" or "Poster Board +"
  2. If you have a Cricut Maker, use the Double Scoring Wheel.
  3. Cut "pretty side down" if appropriate (not what I did).
  4. Set your material size to 11" x 8.5" (letter)

Make the Project:

  1. Cut and weed both mats. You will have three pieces ("Stand", "Holder", and "Front")
  2. Take the "Stand" piece and fold all score lines to the back.
  3. Secure the top corners to the folded back top of the stand using Glue Dots.
  4. Hold the "Holder" piece so the three parallel score lines are towards the bottom. Fold the upper two score lines to the front; fold the lowest score line to the back.
  5. Use a tape runner on the plain side of the bottom of the holder to secure it to its adjacent section.
  6. Holding the "Front" with printed side facing you, fold all score lines to front at 90 degrees. 
  7. Turn the piece so you are looking at the unprinted side.
  8. Using a tape runner or Glue Dots, secure the "Holder" piece to the "Front", matching up the large rectangle and the folded-up ledge beneath it.
  9. Fold the side fronts over the "Holder", and use Glue Dots to secure the corner flaps to the bottom ledge. 
  10. Using Glue Dots, secure the two long tabs to the bottom ledge.
  11. Using the tape runner, Secure the front/holder piece to the "stand", matching large flat rectangles.

Finishing

Add business cards and set on table.

Note: if you prefer your cardholder to slant rather than stand upright, align the "Stand" with the top of the "Holder" rather than the bottom.