Showing posts with label HTV. Show all posts

Saturday, March 21, 2020

Delayering Iron-On Vinyl for Improved Wearability

Two major issues with multiple-single-color vinyl designs are that there is no method for registering the various colors so the cuts all line up, and that many images are built color-layer upon color-layer, resulting in a finished product that is thick, inflexible, and vulnerable to multiple failure modes (adhesive doesn't stick to blank; adhesive doesn't stick to adhesive; bulging layered area more prone to vinyl being melted during application, or being torn during wear...)

Cricut Design Space's Duplicate and Slice tools make it very easy to remove the underlayers from your design and create a finished product that is well-adhered, comfortable to wear, and long-lasting.

Here's how to do it.

I.

Select a design and bring it into your canvas. (You can either select something from Cricut Access and choose the "Customize" option, or select something from another source.) For this example, I'm using "Koala Hugging Heart" (#MA52A3F9) from Cricut's "A Land Down Under" collection.
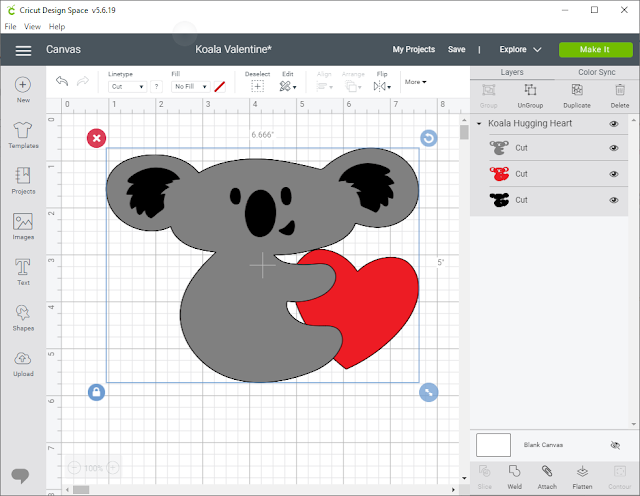


As you will note from the Layers panel on the right, this image is composed of three overlapping images, with the inside ears and features cut out of both the middle red layer and upper gray layer. You will also notice that the three layers are grouped.
.

While this would create a great three-dimensional image on cardstock (using glue dots between the black and red layers, and dimensional dots between the red and gray layers), in vinyl this would  create two layers through much of the graphic, expanding to three layers over the koala itself. So, we are going to use the duplicate and slice functions to remove the underlayers.

II.

Select the image. 
From the Layers panel (or the Edit panel on a tablet or smartphone), select "Ungroup". 
This allows us to work each layer individually, or in groups of two for slicing.

III.

Select the red and black layers. (You can select multiple layers by holding down the <Shift> key on a computer, or long-pressing the second and subsequent layers on your tablet or phone.)

Select Slice from the bottom of the Layers menu (computer), or from the Actions menu (tablet or phone). 
This will give you three "slices": 
  • a red koala
  • an identical black koala, and 
  • a black set of koala ears-and-features.

IV.

From the Layers panel, select the black koala.  (It doesn't matter that the red koala is on top.)
Delete the black koala.

V.

Select the gray koala and the red koala.
To make sure they're aligned correctly, select "Align" from the menu bar (computer) or the Edit menu (tablet or phone), and select "Align left" and then "Align middle".
Select Slice from the bottom of the Layers menu (computer), or from the Actions menu (tablet or smartphone). 
Again, this will give you three "slices":
  • the original gray koala
  • an identical red koala
  • a red heart with cutouts for the koala's paws.

VI.

Select, then delete, the red koala.

VII (optional).

If you want to save vinyl, you can separate the inside ears from the facial features as follows:
Select "Shapes" from the menu bar, then select "Square".
Position the square over one ear of the koala.
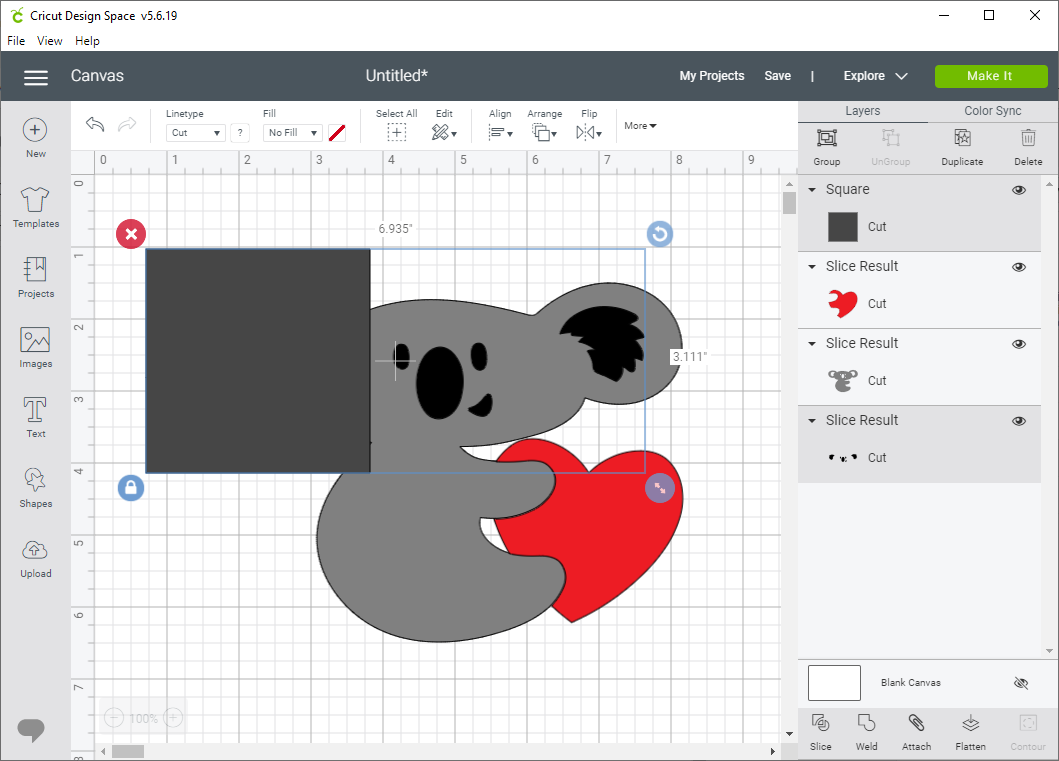
Select the square and the Slice Result containing the koala's features.
Select "Slice".
Select and delete the square.
Select and delete the extra koala inner ear.

Repeat for the second ear.

This will leave you with five layers instead of three. On the original 6.664" x 5" image, this will save about a 2" square of vinyl, about half of the black vinyl needed to cut the image already laid out. Vinyl savings will increase with a larger image size.

Color changed to yellow for visibility

VIII. 

Cut your image.
Remember to mirror iron-on vinyl (or conversely, don't mirror it and do a koala facing to the left). Weed all cut images.

IX. Applying vinyl

For the example image, iron on the koala first. Peel the carrier and keep it (we'll come back to it).
Position the facial features and inner ears. Place the carrier from the koala on top of the image before ironing on the eyes and inner ears.
Peel, retaining again the carrier from the koala.
Position the heart. Again cover the koala with its carrier before ironing on the last part of the image.

For a more complex image, you might want to make a copy of all the parts of the image, change it all to a single color, and cut out the copy in cardstock to use as a template.

Friday, August 16, 2019

Thoughts on Mixing Iron-On Transfers, HTV, and Patterned HTV

For a recent set of t-shirt prototypes for my STARFLEET chapter, I needed a detailed print of a STAR TREK starship, STAR TREK-style lettering, and something to create a starfield background.

It was obvious at the start that I would need to use Print Then Cut on standard iron-on transfer sheets for the starship. I wanted to see if I could use "light" (see-through) iron-on transfer sheets on top of white Siser EasyWeed® Electric Heat Transfer Vinyl to create a metallic effect, or if I would need to use the solid-white iron-on transfer sheets meant for dark fabrics.

While the 6.5" x 9.25" bounding box Design Space requires for registration limits the size of my image, basic geometry tells me that if I angle the image to use the top corner of the box on one side, and the bottom on the other, I should be able to Print Then Cut an image greater than 9" in its long dimension. Unfortunately, no matter what orientation I set my starship, or what angle I saved and resaved it at in Photoshop, Design Space insisted on placing it on a vertical or horizontal axis and telling me it was too large for Print Then Cut. I ended up having to edit the orientation again in Mat View in order to print my images at something approaching my desired size.

Once I got my graphic in the correct size and orientation, I used a rotated version of it to create a "knockout" against a desired circular "star field" of either "Galaxy Black" Siser Glitter Heat Transfer Vinyl or Siser EasyPatterns® Heat Transfer Vinyl in "Infinite Galaxy" (that is to say, I delayered my text and images from my background).

Then I printed and cut the color-enhanced line-art starship from both dark-fabric and light-fabric iron-on transfers. I also cut the outline from "Pearl" (metallic white) Siser EasyWeed® Electric Heat Transfer Vinyl to place under the sheer "light fabric" transfer. I also cut the rest of my graphics (round "star field", chapter name, NCC number, "stardate" established, URL, and What 3 Words location)

Unlike most other heat transfer vinyls, Siser EasyPatterns® is cut from the "right" side of the vinyl, and is transferred to the surface to be ironed by a special vinyl transfer tape that is supposed not to be the same as the transfer tape used for adhesive vinyl.  I decided to try to use this transfer tape to position and iron on not just the EasyPatterns vinyl, but the dark fabric iron-on transfer as well.

The two prototypes I ended up with were purple (chapter's main color) with the "Infinite Galaxy" pattern for the star field and (if I recall correctly) the dark-fabric transfer for the starship, and navy (another "spacey" color) with "Galaxy Black" glitter for the star field, the white EasyWeed Electric and the light-fabric iron-on transfer for the starship. Both t-shirts used plain white for the lettering.

(Sadly, I didn't take pictures before I sold the one prototype and gave the other one to our chapter president to show off at an upcoming STAR TREK convention.)

It had been a while since I worked with iron-on heat transfers — since before I purchased my Cricut Explore Air and (more importantly) my Cricut EasyPress. Sadly, things didn't work out quite the way I wanted. The light-fabric transfer didn't want to transfer the image properly to the heat transfer vinyl, and the temperatures I needed to place all the pieces together caused the Siser EasyWeed® Electric Heat Transfer Vinyl to melt, and the iron-on transfers to melt a bit as well.

That said, a new design of chapter t-shirt is never an unwelcome thing, and it started us into a discussion of What 3 Words and its possible utility when colonizing an alien planet (hey, we're into STAR TREK, science fiction, and space exploration!)

Given the issues I had mixing the two types of iron-on, I finished the project knowing I'd need to do some more experimentation. Stay tuned for the next installment of "trying to get them to play nice together" <g>...

Wednesday, January 9, 2019

Working With Vinyl Scraps

One of the downsides of large T-shirt designs such as "Hippopotamus for Christmas" and "Dreidel for Dummies" is the amount of heat-transfer vinyl (iron-on, HTV) that they use. Not counting the costs for licensing Cricut Access images, the hippo T would have cost me $30 in materials; the dreidel T, $20, had I not been working at Michaels and been able to use Associate discounts on top of sale prices. I'm not counting design time or application time, and I've saved a significant amount of vinyl on the hippo by delayering the images. This would put the retail price of a vinyl T somewhere in the $30-40 range, even for a $2-on-sale craft T-shirt. (The blanks Cricut associates use on their instruction videos run $10-15 on sale at places like Target and Old Navy, making a more "designer" look that much more expensive!)

My colleague S. would have loved a hippo T, but the materials costs alone would be out of budget for her. I found a cute Snowman T-shirt pattern on Design Space that could be made cheaply from scrap vinyl — with a few tweaks to the pattern.

When I looked at the mats, I noticed all the little black dots for the snowman's eyes and mouth were attached, as well as the white dots for the reflections in the snowman's eyes. That ends up creating a lot of wasted vinyl. I also noticed that there was no way to register the cut so one knew exactly where to place the orange nose.


Since Design Space doesn't have a good way of setting registration marks, I decided to create a paper template.

First, I attached all of the design elements into a single cut image and resized it to an appropriate size for the T-shirt. Attaching elements turns them all the same color, but it's easy enough to turn them back later.)


I used this monochrome to cut my paper template. Instead of weeding the background, I weeded out the design elements to produce a template with openings for each of my vinyl cuts. While the weeding isn't perfect, it's sufficient for my purpose.


Next, I detached all of the design elements and returned them to their proper colors. I also delayered the inner eye, so I would only have one layer of vinyl throughout the shirt.


You'll notice these use a lot less vinyl if cut from a fresh roll. Each piece can be moved individually, so they can be positioned to use waste vinyl, either manually (in the Web app) or by using the Snap Mat feature on an iPad. I used scrap vinyl from "Dreidel for Dummies" and "Baby, It's Cold Outside" for my white and black, and the rest of a "row" of rolled vinyl for my orange.


My final cost: about $6, if I include the vinyl as rolling inches.

Needless to say, S. was surprised and delighted.