Thursday, April 25, 2019

Unicorn Party Hat

One of my colleagues is known for her collection of deely-boppers and headbands; she has at least one for every occasion, and is always collecting more.

While some of our customers suggest I should do likewise, that sort of head decor is not really my thing. My Kitschy Christmakwanzakah Fascinator (with full sets of felt Chanukah and Kwanzaa "candles") is about as far as I'm willing to go.

That said, a couple of weeks ago I was tapped to do another "Unicorn Fantasy" birthday party at Michaels. I had recently licensed a number of unicorn and unicorn-related images from DesignBundles.net, and decided that a party hat might be a cool thing to design. After a bit of browsing through the many images in the "Unicorn Bundle" I'd licensed, I decided on one of MStudio's designs from this group: a horn with a pair of horse ears and simple paper flowers. The original design also had eyelashes, but in order to make a headband, I needed to delete them from the image I'd be cutting.
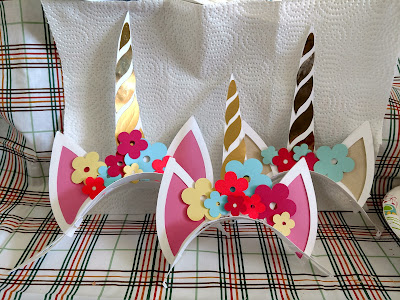
A very large horn (left) before some better-scaled ones
Because I wanted my headband to have some dimensional layering, I had to reconstruct the underlayers from the original design so one could see the entire horn and flowers from both front and sides.

Backer piece, held onto the headband with paper tabs
On the fit side, I needed to add curvature so the design would sit on a human head and attach to a headband to hold it there. I also needed to create a backer for the design elements as well as the headband, and set everything to a reasonable scale. It took several tries to get it right.

I used Aleene's Quick Dry Tacky Glue and Studio G dimensional foam dots (similar to these) in the assembly process: first, manually gluing the horn bits to the back of the design, then the inside ears, then several layers of outside ears, and the top half of the tabs that secure the back to the headband.

(Note: I suggest using paper clips to clamp glued papers together until they dry.)

Side view shows holes for optional elastic.

Finally, the flowers went on with dimensional dots, and the design was ready to try out.


The design for this party hat is on my Design Space profile.

Tuesday, April 23, 2019

Business Card Holder Redux

After looking at the Business Card Holder design I published last month, I realized it would be an easy fix to make it slant backwards in the way we are used to seeing business cards presented. I also decided I didn't like the way the edge of the "holder" piece stuck out over the top, and the way the top corners of the "stand" piece were exposed.

In this edited design, the holder will stand slightly slanted, and the top of the "holder" is scored so that it can be glued across the top of the "stand".

I originally thought to suggest a pair of glue dots to secure the front part of the "holder" to the folded-to-front sides of the "front". As it turns out, Aleene's Fast Grab Tacky Glue is really good on this project, as long as you use paper clips to clamp the glued areas in place until they dry (about a minute or two).

Both of the above links should forward to my projects on Cricut Design Space.

The unicorn-theme paper design was tiled from Krystsina Kvilis (@peace-art)'s "Magical collection of unicorns II" from Design Bundles.net. (I had intended this particular holder for use at a unicorn-themed event.)

Front view (it got a bit crushed traveling)

Side view: slanted versus upright card holders

Oblique view, comparing the two designs