Saturday, November 7, 2020

By the Pricking of My Thumbs - National Diabetes Month

 "By the pricking of my thumbs
Something wicked this way comes."

    --Second Witch, Macbeth IV:1

American Hallowe'en is associated with literary wickedness, cartoon witches and ghosts, jack-o'lanterns, and schlock horror films of decades past. It's no surprise that many Hallowe'en designs draw from Shakespeare's "Scottish play", whether "Double, double, toil, and trouble" or "Something wicked this way comes".

And so I wasn't surprised to see "something wicked" on a crafting YouTuber's t-shirt.

That said, pricking our thumbs (and other fingers) to deliberately draw blood, Sleeping Beauty-style, is a necessary behavior for most people living with diabetes: the small blood drop feeds a chemically active sensor in a device that tells us our current blood glucose ("blood sugar") levels. This information tells us if we need insulin, or sugar or carbohydrates, and whether we are "safe" to drive, to work out, to sleep...

November is Diabetes Awareness Month: American Diabetes Month in the US, Canadian Diabetes Month in Canada, and so on. It is the month of Dr. Frederick Banting's - the discoverer of insulin's - birth; his birthday (November 14) is celebrated around the world as World Diabetes Day.

So it shouldn't be a surprise that the second half of the Wise Sister's quote reminded me of the first, and of my many friends, colleagues, and family members living with diabetes. It took a bit of time to replace "something wicked" with a phrase that "scanned" properly (had the same number of syllables and similar stresses), and a bit longer to do the artwork. The typeface is "feather" by NJ Studio, available at Font Bundles.

Now, to choose a number.

In the "English" units used in the United States, the ideal blood glucose range to which we're asked to manage is from 80 to 180 mg/dl (milligrams per deciliter), with an average non-diabetic number being roughly 100 mg/dl, which is what we tend to see in glucometer advertisements. While a spot reading in this range may not be unreasonable for those of us with what I refer to as "mild" Type 2 diabetes, it's an extremely unlikely number for a person with Type 1 diabetes or more advanced Type 2, and this "random" glucose number is a serious point of contention in our communities. 

My choice of "169" is based on a recollection of one of my Type 1 friends mentioning the 160s in her typical range for something

The detail of the blood drops, the lines of the thumbs, and the blood uptake on the test strip mean this design will be difficult to reproduce in vinyl, and may need to be produced as a sublimation print or an iron-on transfer. That said, I think I would replace the readout window with a piece of chalkboard iron-on vinyl so that the person wearing the shirt could add whatever number was current or more appropriate for the time the shirt was being worn.


Wednesday, August 19, 2020

Not-Corned Beef Burgers

 So, in the middle of all the COVID-19 confusion, my state political party decided to hold its annual picnic and general meeting on a Saturday. These are generally pot-luck/covered-dish sorts of events where the venue has grills to use and everyone brings something to eat with enough to share. 

With things a bit of a last-minute for me, and me never trusting anyone else's grill to be have never cooked dairy or pork (or animals that could not ever be kosher), I decided to save myself next-day cleanup mess by bringing along a chili that could top burgers or hot dogs, or be eaten by itself. Unusually for me, I decided on a beef-and-bean chili (I usually make my chilis pareve/vegan so that I can either top them with cheese or use them to top a burger or hot dog). So I picked up several pounds of ground beef and several pounds of dried beans, and set the beans to soak overnight Thursday. 

Technique note: I soak my beans for chili in water that includes onion powder, garlic powder, one or two whole dried chilis, and a few bay leaves. I cook my beans in water that contains similar seasonings. I believe this counteracts the beans' usual blandness.

When I got home from work Friday morning and checked my email, I found a message saying the picnic had been cancelled due to a power outage at the venue. While we had had heavy rains mid-week, it had never occurred to me that power would be an issue: I'm used to doing Field Day (an annual Ham Radio event) with portable generators that ran the radios and the lights, and gas- or charcoal-powered grills to cook our meals.

So, I made as little of the chili as I could to use up the beans, but I still had four pounds of hermetically-sealed extra-lean ground beef in the refrigerator, with no space to freeze it, and with a use-by date a week or two out.

Somewhere along the line I got the idea to see what would happen if I used corned-beef or pastrami seasoning on ground beef, and serve those burgers on rye buns. Researching recipes for corned beef and pastrami were a bit tricky, since most of them started out with already-brined brisket (the sort that is only inexpensive around Saint Patrick's Day) and pre-packaged, whole pickling spices.

After a bit of work, I found  few reasonable recipes for corned beef, and a few different options for pickling spice blends. Since putting whole spices into burgers is (obviously) Not A Good Idea, I had to convert the whole-spice measurements into weight substitutes so I could measure out ground spices to make my blend.

Please note there are a few issues with using ground spices instead of whole spices, and mixing spices into ground beef meant for the grill as opposed to brining a whole brisket for over a week and then simmering it with a fresh packet of pickling spice. These include:

  • Whole spices release their flavor much more slowly than ground spices
  • Salt and acid break down tough flesh and also help infuse spice flavor into the meat (this is why tougher cuts of meat are usually brined or marinated in a wine or vinegar mixture).
  • Depending on whether your spices are freshly ground or have been hanging around a while, your ground spices can have a stronger or a weaker flavor than their whole progenitors.
  • It's difficult to tell a priori how much flavor has infused into a brisket and how that relates to how much of a ground-spice blend to add to ground beef.

Needless to say, our crazy work schedules left me putting off and putting off using the ground beef until it was two days past its "use or freeze" date. So it was "now or never" for putting my blend together and trying it out.

I would have done a lot more fresh-grinding if one of my store-and-grind containers hadn't broken and my hands and arms weren't sore from various recent injuries; as a result, a lot of my mixture came from my very long-in-the-tooth ground-spice rack. That said, it required a bit of tasting along the way to decide how much salt I needed to add in, whether I really had enough mustard, and that ground bay leaf needs a slightly lighter hand, weight-wise, than its whole-leaf component (to avoid bitterness).

Please note that while I purchase a number of my harder-to-find and specific-origin spices from Savory Spice Shop, it is because their nearest retail store is convenient to me (about five miles from home) and has a great selection. Many similar seasonings can be found from brands such as Simply Organic at places like Whole Foods.

The proportions I ended up with were:

  • 11.5 g ground coriander
  • 8 g ground black pepper
  • 14.5 g mustard powder
  • 0.4 g Powdered Turkish Bay Leaves
  • 3 g ground allspice
  • 1.5 g garlic powder
  • 6 g onion powder
  • 10 g sea salt, freshly ground (I use La Baleine as my usual table salt; for a smokier taste I might have substituted something like Hickory Smoked Sea Salt or Alderwood Smoked Sea Salt
  • 0.5 g White Wine Vinegar Powder (for acidity)
  • 3 g Cook's Charcoal Seasoning (to enhance the "grilled" taste)
This resulted in approximately 1/2 c (8 tablespoons) of spice mix, about 2 oz (57.4 g).

Once I got the spice mixture together, the next thing I needed to figure out was how much to use for my no-time-to-sit-and-marinate ground beef. (I still believe the best method for this sort of seasoning would be to season the beef and let it sit in the refrigerator for a day or two before grilling. That sort of "soak" time would require a lot less spice than cooking the burgers immediately.) While most of my as-purchased seasoning mixes suggest using 1/4 teaspoon per pound of meat, I started with an amount of spice which, in whole form, was intended to season approximately four pounds of meat (the same amount I had). A teaspoon for the whole lot would have been gross underkill, but the entire half-cup of spice blend would have been way too much.

I settled on an initial trial of about 4.5 teaspoons for my ground beef. My sister found it overseasoned, while my Other Half thought it needed a bit more. I found it pleasant as it was, but definitely not tasting anywhere close to corned beef. Adding more spice helped, as did using some of the mixture as the basis for a spread which could be used on its own or as an adjunct to mustard.

Final proportions:

The next time I use this for immediate grilling, I'll use the proportions of about 6 t per 4 lb, or 1.5 t (1/2 T) per pound of beef.

I also made a nice bit of a spread by mixing 1/2 t spice mix with 1/2 t honey and about 1.5 T balsamic vinegar. I probably should have added a bit more honey, but it was a nice way to boost the flavor of the seasoning. I might try making up a cup of that mix as a wet marinade for a London Broil or a roast.

If I were going to season a day or two in advance of grilling, I'd probably start with about half of that and see from there.

Now I have another seasoning mix to work with. 

More "Fun With Food"!

Monday, June 15, 2020

MLK, X Heritage and Schiller's Ode to Joy

Because it's such a great set of sound bites, I suspect that many of us most remember Dr. Martin Luther King from his "I have a dream" speech — a speech in which he dreams that one day, "little black boys and black girls will be able to join hands with little white boys and white girls as sisters and brothers".

While it's an ideal that still bears repeating, Dr. King is not the first to have considered the idea. In 1808, Friedrich Schiller wrote the words that were transformed by Ludwig van Beethoven into the first-ever symphony that employed a chorus, his Ninth ("Ode to Joy"). Referring to some future Elysium, Schiller writes "Alle Menschen werden Brüder" — all men shall be brothers. Yitzhak Peretz further expands this in his Yiddish lyric, my first exposure to Beethoven's tune, starting out with the line "Alle mentschen zaynen brider — broyne, gele, schvartze, vaysse". Rather than hoping for brotherhood in some Utopic future, he affirmatively states that we are brothers, right now, regardless of the color of our skin ("brown, yellow, black, white"). Thinking of the rainbow of my multicultural neighborhood, our store's customers, and the general area in which I live, restricting Dr. King's dream to just two extremes of skin tone seems... constrictive.

I started creating a field of generic (featureless) faces of different skin tones and hair colors, and even a couple of "covered" faces to honor the Muslims in our local community...

Further, in today's times, when our sense of gender has expanded beyond the binary, I tried adding a few faces with hairstyles that could be either male or female.

Then, finally, I added in Schiller's and Peretz's words (Yiddish is traditionally written in a variant of the Hebrew alphabet).
In checking the correct German and Yiddish spellings, I learned that some time later in his life, Peretz and others looked at his words more sarcastically than literally — though my Yiddish teacher emphasized to our post-détente class their Jewish Socialist origins. Meanwhile, I spent much of late January with an "Ode to Joy" earworm.

A design with this variety of colors lends itself well to using up vinyl scraps for the faces' hairstyles and hijabs, using paper templates to help with placement. Conversely, it does require a somewhat neutral background so as not to clash with those colors. I set my template to light gray to better visualize my layout, and after playing around with a number of colors decided that would be the correct background for my design.

Having missed Black Heritage Month and Hispanic Heritage Month, I was going to put this design away for next year. But in light of today's Black Lives Matter protests, I'm not waiting. It's not just people whose names might be "Brown" or "Hightower" (stereotypically African-American surnames) that matter: it's people whose (stereotypical) names might be Sanchez, Diaz, Rodriguez, Marcos; Chang, Wang, Li; Singh, Patel, Choudry; Farouk, Mohammed, Abdullah; Redcloud, Silverbird... and even people whose last names might be MacDiarmaid, van Gerwen, Santelli, or Rosenberg...


Wednesday, May 27, 2020

Coronavirus Fatigue

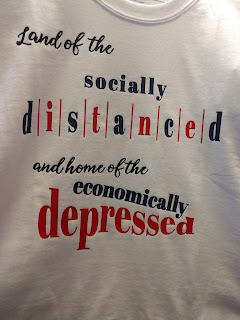
I don't need to mention that life has turned upside-down for many of us this year. Social isolation (excuse me, social distancing), masking to "protect others" (at the expense of one's own health), and "sheltering in place" (again, at the expense of one's own health) have become by-words for all, and a new sort of social shaming has arisen...

Like many on the personal-liberty end of the spectrum, I've been of the belief that while the worst of the disease is serious, our sociopolitical reaction to it is overblown, and we're putting our individual and community economic health at risk. We've been using a "portmanteau" (a word made up of two other words combined) to describe the current sociopoliticaleconomic situation: a panicdemic.

Welcome to the PANICdemic
While we have been fortunate in that the government stimuli have afforded us (at least for the month my sister and I were furloughed by our retail jobs) more money than we were making working (which we had to give up to return to our jobs), we realize that $600/week is chicken feed for those making a "living wage" or better (middle class in New Jersey starts at about $100k annual gross income), and most small business owners are losing everything they own — including their homes and businesses — because of shut-down and shelter-in-place orders. In short, many are
I think this describes most of us during the panicdemic
The variety of patriotic "Red, White & Blue" t-shirts we're selling this year strike an extremely off note as our constitutionally-guaranteed freedoms have been trampled upon by state and local officials in the name of "flattening the curve", "stopping the spread", writing "small business" stimuli such that they can only benefit "essential" big-box stores and "too big to fail" retailers (i.e., Amazon and  Walmart). In short, we have become the
I think this describes us better at this point in time than the National Anthem
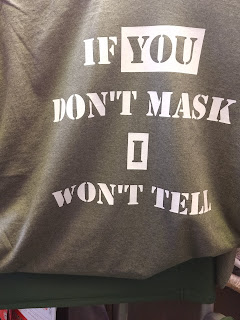
 Since moving into a "masks required by law" environment, I have found that face coverings restrict my air intake (I swear one of these days I'm likely to aspirate my mask and suffocate!) and, because I have to SHOUT to be heard as as ||whisper||, dampening the mask with those droplets we're supposed to be not spreading, attracting and holding those airborne viruses we're supposed to be avoiding. I'm not alone in my dislike of mandatory facial coverings (especially when outdoors, at home — even in the public spaces of the multi-family dwelling in which we live, or at a reasonable distance from others), and therefore, I propose a bit of a throwback to the Clinton era:
Thankfully, our LGBTQIA+ community can serve openly now

I have a few other "Don't Mask/Won't Tell" designs, but they haven't made it onto T-shirts yet.

On the bright side of things, my sister's hairdresser is expecting her first child any day now. I had wanted to make an Infusible Ink onesie for her amidst some of the other things my sister wants to give, but was falling shy on inspiration. Amongst all this lockdown-fatigue creativity, it finally hit me:

I hope the baby never has to remember the panicdemic, the social distancing, the mandatory masking (are babies fussing over not recognizing parents in facial coverings like they do when parents don/doff spectacles?), or the economic devastation these illnesses are causing, and that she lives — like Moses — to 120 (or as long as she wishes to and is able to!) in good physical and mental health.

Saturday, March 21, 2020

Delayering Iron-On Vinyl for Improved Wearability

Two major issues with multiple-single-color vinyl designs are that there is no method for registering the various colors so the cuts all line up, and that many images are built color-layer upon color-layer, resulting in a finished product that is thick, inflexible, and vulnerable to multiple failure modes (adhesive doesn't stick to blank; adhesive doesn't stick to adhesive; bulging layered area more prone to vinyl being melted during application, or being torn during wear...)

Cricut Design Space's Duplicate and Slice tools make it very easy to remove the underlayers from your design and create a finished product that is well-adhered, comfortable to wear, and long-lasting.

Here's how to do it.

I.

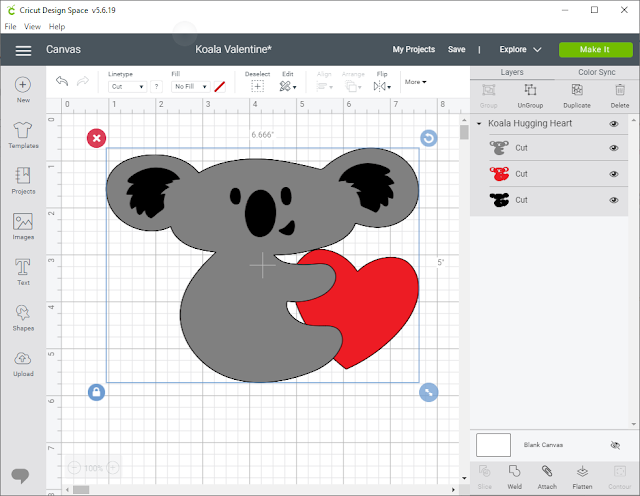
Select a design and bring it into your canvas. (You can either select something from Cricut Access and choose the "Customize" option, or select something from another source.) For this example, I'm using "Koala Hugging Heart" (#MA52A3F9) from Cricut's "A Land Down Under" collection.


As you will note from the Layers panel on the right, this image is composed of three overlapping images, with the inside ears and features cut out of both the middle red layer and upper gray layer. You will also notice that the three layers are grouped.
.

While this would create a great three-dimensional image on cardstock (using glue dots between the black and red layers, and dimensional dots between the red and gray layers), in vinyl this would  create two layers through much of the graphic, expanding to three layers over the koala itself. So, we are going to use the duplicate and slice functions to remove the underlayers.

II.

Select the image. 
From the Layers panel (or the Edit panel on a tablet or smartphone), select "Ungroup". 
This allows us to work each layer individually, or in groups of two for slicing.

III.

Select the red and black layers. (You can select multiple layers by holding down the <Shift> key on a computer, or long-pressing the second and subsequent layers on your tablet or phone.)

Select Slice from the bottom of the Layers menu (computer), or from the Actions menu (tablet or phone). 
This will give you three "slices": 
  • a red koala
  • an identical black koala, and 
  • a black set of koala ears-and-features.

IV.

From the Layers panel, select the black koala.  (It doesn't matter that the red koala is on top.)
Delete the black koala.

V.

Select the gray koala and the red koala.
To make sure they're aligned correctly, select "Align" from the menu bar (computer) or the Edit menu (tablet or phone), and select "Align left" and then "Align middle".
Select Slice from the bottom of the Layers menu (computer), or from the Actions menu (tablet or smartphone). 
Again, this will give you three "slices":
  • the original gray koala
  • an identical red koala
  • a red heart with cutouts for the koala's paws.

VI.

Select, then delete, the red koala.

VII (optional).

If you want to save vinyl, you can separate the inside ears from the facial features as follows:
Select "Shapes" from the menu bar, then select "Square".
Position the square over one ear of the koala.

Select the square and the Slice Result containing the koala's features.
Select "Slice".
Select and delete the square.
Select and delete the extra koala inner ear.

Repeat for the second ear.

This will leave you with five layers instead of three. On the original 6.664" x 5" image, this will save about a 2" square of vinyl, about half of the black vinyl needed to cut the image already laid out. Vinyl savings will increase with a larger image size.

Color changed to yellow for visibility

VIII. 

Cut your image.
Remember to mirror iron-on vinyl (or conversely, don't mirror it and do a koala facing to the left). Weed all cut images.

IX. Applying vinyl

For the example image, iron on the koala first. Peel the carrier and keep it (we'll come back to it).
Position the facial features and inner ears. Place the carrier from the koala on top of the image before ironing on the eyes and inner ears.
Peel, retaining again the carrier from the koala.
Position the heart. Again cover the koala with its carrier before ironing on the last part of the image.

For a more complex image, you might want to make a copy of all the parts of the image, change it all to a single color, and cut out the copy in cardstock to use as a template.