Tuesday, February 6, 2018

Hand Lettering: Brushing Off Cursive Writing for Calligraphy

Much to my surprise, calligraphy is becoming popular again.

Back in my college days, schoolteachers observed that teaching beginning writers a calligraphic hand — either as opposed to, or in addition to, Cursive Writing — had the happy result of students with better, more legible handwriting. Since "Penmanship" (handwriting, with the goal of accurately replicating standard letter forms at all times and speeds) was my worst grade in school, I felt compelled to take up the study.

By the time I graduated, I had a stash of several Osmiroid left-hand fountain pens (yes, I'm left-dominant!) in both standard and my preferred oblique styles, several Speedball handles and an assortment of nibs, a handful of India and colored inks, and a preference for writing ornamental "text" hands on smooth vellum paper.
Vintage Calligraphy Supplies
While I've practiced on and off during the intervening years, (and added a Platignum set and a few Rotring fountain pens to my stash), I put my pens and inks away (I'd thought for good!) when it became simpler and easier to specify a typeface and size on my computer (I usually had several hundred faces installed at any given time) than to struggle with letterforms and slants that didn't stay as straight and as perfect as I would have liked.

While Michaels has sold a limited number of calligraphy pens and inks over the past several years, most customers were only interested in calligraphy markers — whether the Zig memory, Recollections (our house brand), or Speedball Elegant Writer. I've always associated these markers with dull corners, uneven edges, and dried-out inks — nothing worthy of the effort of fine lettering. (Then again, many professional calligraphers feel the same about steel pens as opposed to hand-cut quills and reeds...)

In the past year or so, our calligraphy offerings have expanded. We now have a couple of Manuscript brand sets, as well as a Speedball set or two, a set of Asian calligraphy brushes, and two lines of calligraphy ink.

So, too, has the range of popular calligraphy — although to make it less scary, we're calling it "hand lettering". And instead of using scary, blotty, messy dip pens (or slightly less scary, but still blotty and messy flat-tip fountain pens), we're using brush markers. And the letterforms we're teaching look more like Copperplate than Chancery Italic or Fette Fraktur.

Marker-Calligraphy Supplies
(Which, frankly, is making Copperplate seem a whole lot less scary to me.)

Of course none of pens we sell are designed for lefties, which is one of the reasons I've had to haul my stash out of storage. (The other main reason is to try to give my colleagues a feel for what our calligraphy customers might ask about or need.)

The latest "trend" in this craft area, which our buyers and merchandisers would like to believe is leading this return to hand-lettering, is "journaling". Like "planning", this seems to be an underdefined category. Our "journaling" aisle includes blank books for sketching, visualization, vacation planning, bucket-lists, to-do lists, and possibly even some diary-writing and creative writing. (There's a better-defined subsection of this area called "Bible Journaling", which I would suspect relates to individual and directed Bible study, and includes pocket inserts such as "Prayer Lists".)

During the process of preparing for tonight's "Hand Lettering" class, I've picked up and experimented with several types of brush marker, purchased some left-handed calligraphy markers, and started resurrecting my old dip pens. Unfortunately, both Osmiroid and Platignum have left the calligraphy-pen market, and while I have the tips, my old barrels are nowhere to be found. Surprisingly, though, a few of my inks — at least one of which bears the price tag from its purchase over 35 years ago — are still good. Time to get some new parchment, vellum, and chain-and-laid paper, and start playing with letters again.

The Great Fabric Medium Experiment, Part V

As you may recall, I spent some time this fall gathering different brands of fabric medium, different brands and qualities of acrylic paints, and testing them all at different dilution levels to find which would be the optimal combination for painting T-shirts.

The delay in posting the concluding part (parts?) to this experiment was a delay in heat-treating, curing, and washing the test T-shirts.

While the paint swatches were more flexible when warm, I'm not sure how much heat treating did for the preservation of the paint work.

More important is, how well did the samples survive the wash, and how wearable the paint/medium combinations are.

The yellow Liquitex acrylic ink pretty much disappeared into the red t-shirt, but it was fairly transparent to begin with. The more fabric medium in the mix, the less it seems to disappear into the fabric. It's fine on a lighter color fabric, such as the bleached areas on my Boo Christmas t-shirt, and no fabric medium was needed for that application.

The Golden High Flow paint//ink was soft enough without fabric medium, and looks like the Delta Ceramcoat and Americana fabric mediums have minimized what looks like a very minor amount of bleeding of the unadulterated paint.

Without fabric medium, the Golden Fluid and Liquitex Soft Body paints come out as similar textures to the various brands of craft paint, but with brighter color due to their higher concentrations of pigment — which is pretty much the same as before anything was heat-treated or washed. That said, neither is completely opaque.

In general, the thicker the paint, the stiffer the sample patch, even with fabric medium and washing. The thicker paints and applications (e.g., two coats) were also more likely to crack.

Of the craft paints, Folk Art gave the softest finish; it and Martha Stewart are the best for opacity.

The odd swatches of specifically-formulated "fabric paint" were a bit softer than their craft-paint equivalents, but not necessarily more opaque.

My patches of Elmer's "washable" School Glue did not wash out of the shirt, but I'm not sure if that's because I let it set in too long.

Friday, December 22, 2017

Bleaching, Dyeing, Painting, and Having Pun With T-Shirts

Having grown up in the 1970s, my initial tie-dye experience was of the overdiluted-dye, dip-and-hold, wash-with-vinegar Scout camp experience that resulted in faded pastel t-shirts and bandanas. While brushed denims, fades, and prints were becoming popular (and available), teens such as we spent our weekends beading and embroidering our own jeans, sizing them by wearing them in hot-water baths, and fading them by washing them in the bathtub with bleach (replicating the tie-dye effect in reverse).

Folding, banding, and bleaching t-shirts can remove or re-color certain dyes to create graphic effects similar to tie-dyeing. Putting bleach into a spray bottle can add "star field" and "galaxy" night-sky effects to blue t-shirts. And pre-painting with bleach can lighten specific areas of a shirt to make way for more subtle colors without needing multiple stiff, likely-to-crack-even-with-fabric-medium layers of craft paint.

Tips for Reverse-Dyeing With Bleach

  • Bleaching only works on plant fibers and (some) synthetics
    • Bleach will dissolve animal fibers, so keep it far away from wools and silks
  • Work in a well-ventilated area
    • You do not want to be overcome by bleach fumes
  • Wear disposable gloves to protect your hands
  • If using a sprayer or a paintbrush, wash it out with soapy water immediately after finishing your bleach work to avoid rusting the spray pump or destroying the hairs of the paintbrush
  • Test a small, "invisible" area first
    • Not all colors wll bleach; not all will bleach to white
      • Many red are either permanent (will not bleach out), or will only bleach slightly
      • Some navy dyes bleach to a reddish tan
  • Let the bleach "develop" — some fabrics and colors won't change color immediately
    • It may take a couple of minutes (or hours) for the color to fade
    • Some dyes don't show the effects of bleaching until after the bleach has been washed out with water
  • To keep the bleach from spreading out too far, either wash it out before it's bleached through too much, or dry it (in sunlight or with a hand-held dryer or heat gun) before it has a chance to spread
    • Remember to dry a defined-bleached area flat, to prevent the bleached area from "dripping"
  • To create a feathered or fadeout effect, spray the edges of your bleached areas with water before the bleach has time to completely dry; keep an eye out to make sure it doesn't spread too far

Overdyeing

This is the process of adding a color to an existing color. It can be used to change the color of something: I once overdyed ten yards of bright orange twill with red and burgundy dyes to create a warm rose color for a costume; more recently, I tie-dye folded a shirt that had I'd spray bleached to get different color tie dye effects. After that dye run had dried, I refolded the garment and overdyed it with a different squirt-on tie dye. Several iterations later (including another bleach run), this is what I ended up with:

 Mixing in More Coloring Techniques

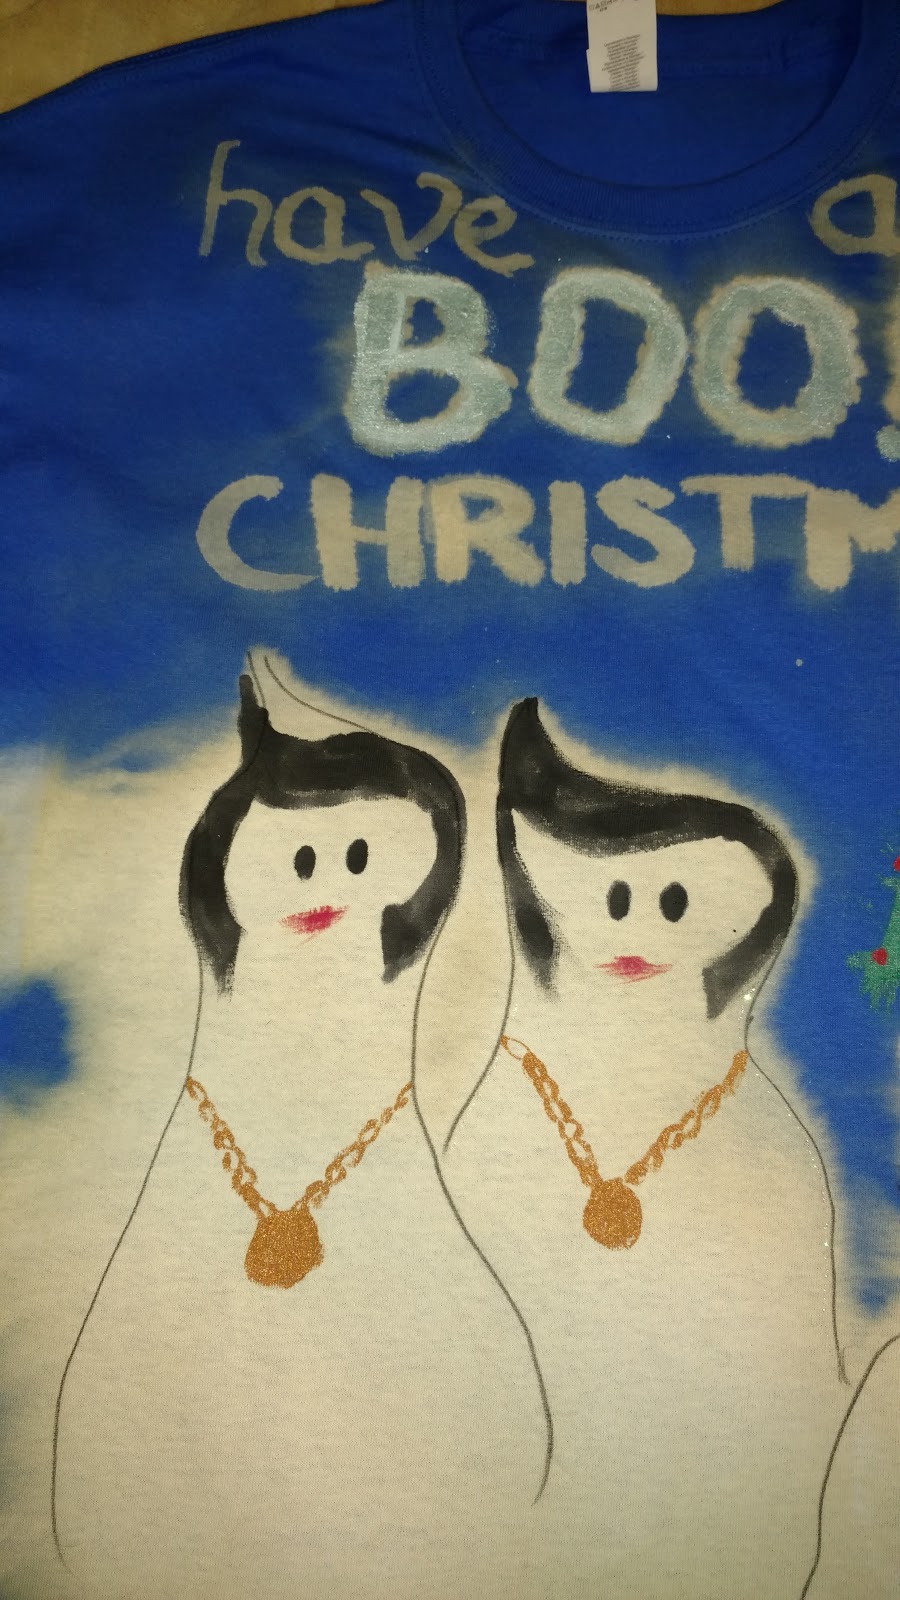
As you might have noticed from some of the earlier photos, I've heard "Blue Christmas" one too many times this season, and decided to have some pun with the title. 
  • I sketched out the areas of the captions and ghosts with a black fabric marker (some white tailor's chalk would have done better). 
  • Then I bleached out the "ghost" and "title" areas of the two shirts by painting them with a half-strength solution of household bleach. Using a paintbrush gave me good control over the areas I was bleaching; I used an inexpensive synthetic fiber brush to avoid the bleach destroying a natural-hair brush, and washed it out immediately afterwards.
  • Some of the side "creep" of the white area on the royal blue shirt resulted from placing it a bit on edge before a sunny window (which is why I suggested drying flat in my bleaching tips above)
  • The royal blue shirt only required small areas of craft paint to put details on the Elvis-impersonator ghosts; I also overpainted the word "boo" with pale blue metallic craft paint.

I took the punning a bit further on the heathered navy shirt, adding (Bob) Marley's ghost to the mix for the obligatory Dickensian reference. (I probably could have added past-present-future props to the backup singers, but didn't think of it at the time.) Since the navy only bleached to a pale brownish red, I used diluted white craft paint to paint in the ghosts and emphasize the text.
  • In order to create the semi-spectral "Bob Marley" colors, I would have preferred to use straight liquid fabric dye for its transparency — but not having any in the appropriate colors, I mixed a couple drops of magenta and cyan dyes with yellow acrylic ink to create the red and green tones, respectively, and used the yellow ink directly for the yellow areas.
  • I used bronze metallic paint mixed with yellow acrylic ink to create a more golden effect for the chains on both shirts, added in metallic green "Christmas trees" with metallic and glitter-dimensional-paint "red" decorations. (Again, I should have probably added white "snow" afterwards, but didn't think of it.)

Having run the pre-bleaching on these shirts tells me I should have used that, rather than trying to use a light color paint (and as close to a "dry brush" technique as I could on untreated fabric) to create the "glow" I wanted around the Christmas tree shirt I'd painted two weeks previously.
Which just goes to show that a bit of preparation and allowing yourself to play with the original colors of a t-shirt can do wonders in creating the effect you want.

Gingerbread, Gingerbread, What Is That Gingerbread?

It's that other gingerbread time of year — that is, not the time that owners of "painted ladies" (Victorian-style homes) search for, install, and/or maintain decoratively-cut and -painted exterior wood trim.

For those who consider gingerbread houses and decorated gingerbread men a family affair, Michaels held its annual family "MAKE A Gingerbread House" event on Saturday, December 2nd. This is a popular event at which we decorate the pre-assembled Wilton gingerbread houses we sell in the store.

Pre-assembled gingerbread takes the time sink out of waiting for each wall to set up long enough to stay upright before trying to add the roof with correctly-angled eaves, giving families the time to add the included royal icing to trim the roof and attach little candies all over the house.

Sticking to the pre-built makes it easier, but what if you want to take it a step further?

We still sell a number of Gingerbread House kits that have all the house pieces baked, and some even embossed with guidelines for drawing windows and doors. They come with bases just big enough to hold the house, instructions, and a moderate selection of candies for trimming. (We also sell the trimmings separately.) Gingerbread House kits are also sold at some larger supermarkets, and even at some of the large drugstore chains.

Other DIY options are using (or tweaking) a recipe to make your own gingerbread and either using a set of cookie cutters that will make a Wilton-style house, or cutting out a set of patterns which can be used to cut and trim your gingerbread before it goes into the oven.

A couple of things to remember about the DIY:
  • There are three different types of baked gingerbread. One is a sort of spice cake, one is an edible cookie (suitable for gingerbread men), and one is a hard (but very hunidity-sensitive) cracker used for gingerbread-house construction.
  • You can probably substitute any hard cookie that doesn't crumble easily and that stands up to moisture — certain sugar cookies and ginger snaps come to mind. (The Manishevitz Chanukah House is based on a vanilla sugar cookie. The Dylan's Candy Bar house uses a chocolate cookie base.) Cookies for gingerbread "men" are not generally strong enough to use for construction.
  • Remember to account for the thickness of your walls and eaves when designing and cutting your construction pieces.
  • The dimensions of your cut-and-baked gingerbread pieces must be exact, or your design may not fit together correctly. You may need to trim or weight pieces immediately after baking to minimize any warp or skew.
  • Not all gingerbread construction has to be a house, or even a Christmas design. Years ago, I purchased a gingerbread construction book because I was blown away by the Victorian townhouse design it included. The first gingerbread building I constructed from scratch was a Valentine-themed "Love Shack". (It wasn't pretty, but it was unique.)
  • Commercially-available gingerbread-house candy trimmings change in design from year to year. Since gingerbread houses are largely for show, some old candies might be OK for trimming. Gumdrops, however, get hard — and the instructions for reviving them don't always work.
  • If you're cutting gumdrops, you need a sharp knife or scissors
Even if you follow the instructions, your construction might not end up as planned. Photograph it anyway: you might get a good story out of it. Case in point:
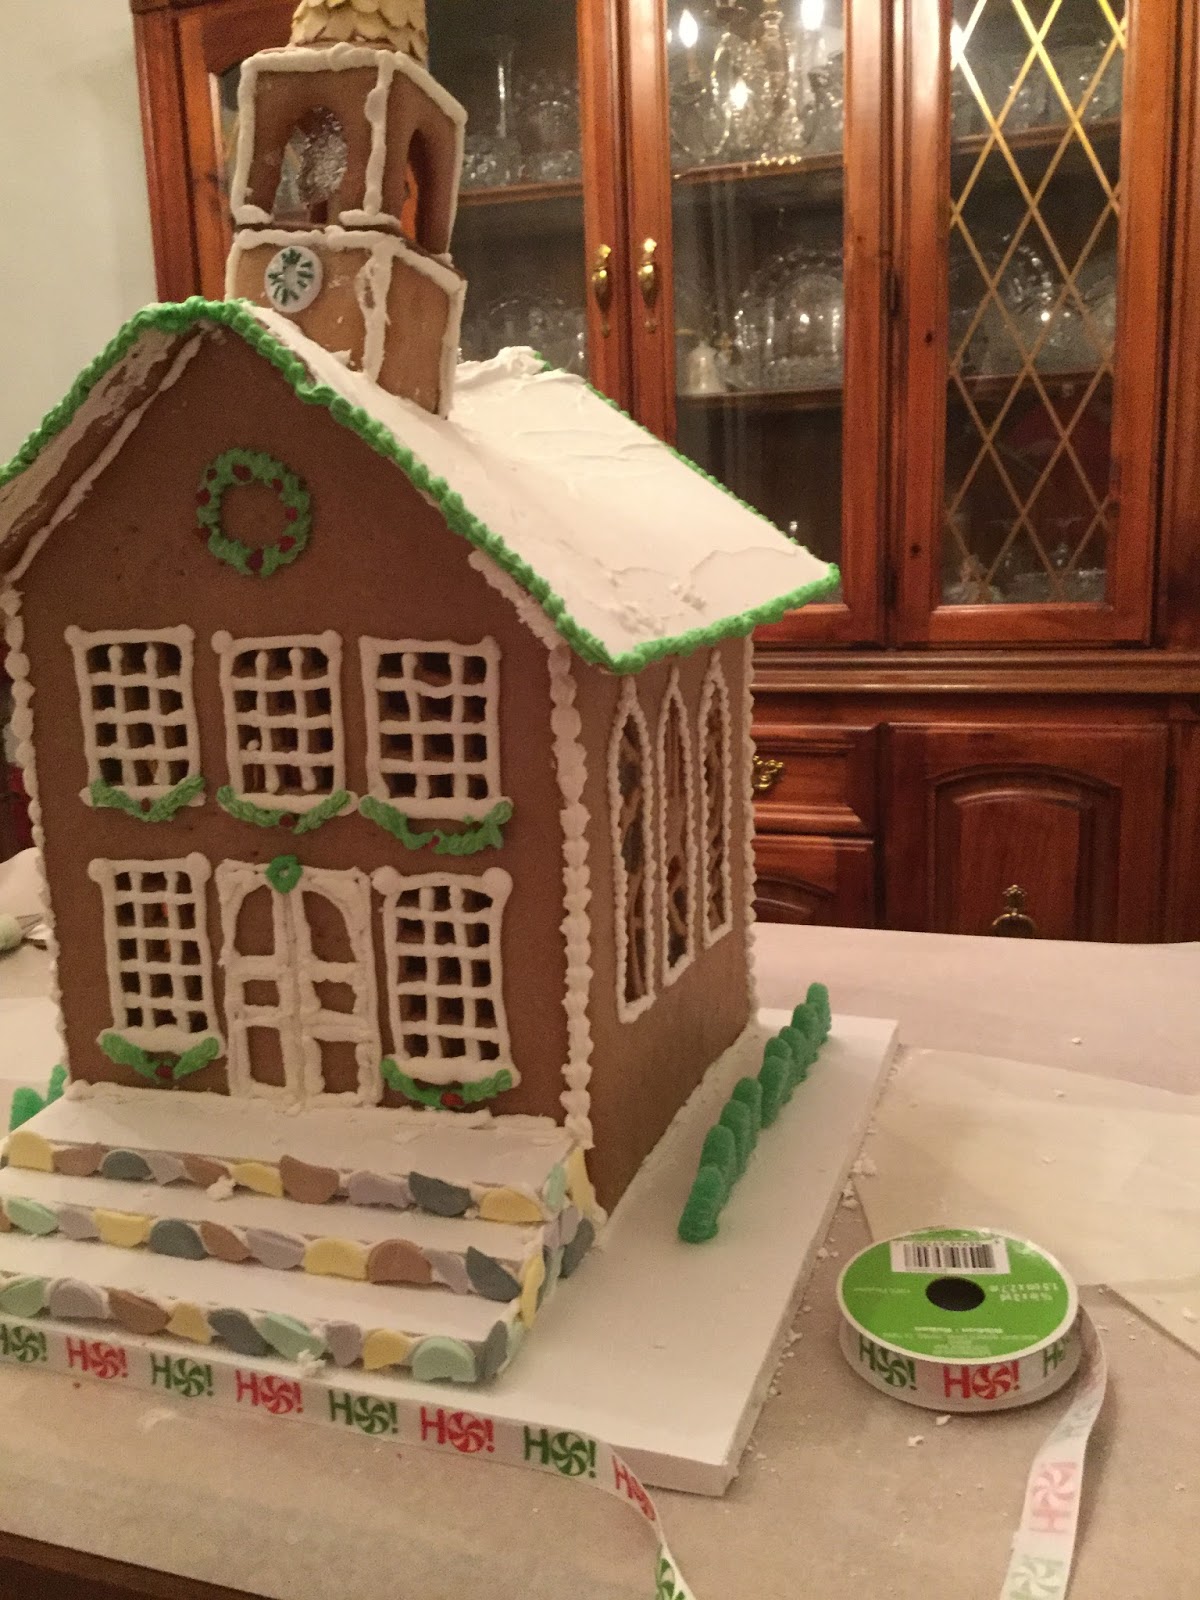
One of my Other Half's family traditions was his aunts' gift of a handmade ceramic church to the niece or nephew who had most recently married. It was time-consuming enough that they made only one church each year, and there was anticipation over "who would get the church this year". That aunt has since passed on, so the last time we went down for Christmas, I wanted to copy the book's gingerbread church as an homage to these two women.

I got the main building constructed and packed for a 300-mile road trip to Virginia. It made it there OK, just the roof fell off (easy to repair) and the back wall developed a crack, which I covered it with royal icing "ivy". The view you're seeing below is several hours on, when the roof decided it was at the wrong angle to attach properly to the back.

At no time did the "pediment" (the triangle that goes under the front eave and may or may not be supported by peppermint sticks) form the same angle as the church front and back, so I was never able to attach it to roof (nor was I able to find the right size peppermint sticks).


Now, this happened to be over that super hot and humid Christmas. The more I tried to fix the issues with the roof, the worse it got.

Roof cracking at the back
The best I was able to do was... not all that great — but at some time near oh-dark-hundred in the morning, I just had to leave it as it was and get some sleep. The following photos show the church at its best (which is admittedly not all that great).


Things were only worse in the morning.

Having had the overnight to sit in increasingly warm humidity, instead of drying, the moisture from the royal icing seeped into the church, making the roof even less stable than it was. Rather than bring it with us, we had to let it set at the house until our noon-ish break.

We returned to sheer disaster. The heat and humidity caused the roof to cave in, one of the side walls to fall outward, and the steeple to end up in the middle of what would have been the equivalent of aisles of pews. (Good thing there were no gingerbread parishoners in there at the time!)
 

So... no grand entry. No nice, pretty gingerbread church. But a story that I still have fun telling.

Wishing you many years of family gingerbread stories...

Wednesday, November 22, 2017

Magic Loop or DPN, That is the Question

Going Round In Circles

When Mom knitted hats and socks — which are usually knitted in the round — she used double-pointed needles (dpns). Sometimes they came in a set of four, other times in a set of five. For a set of n needles, you divided the stitches evenly over n-1 needles and used the last needle as the needle you were knitting onto. As the stitches moved from one of the stitch-holding needles to the working needle, the stitch-holding needle became free. Now that needle was used to work the next needle's worth of stitches, and so on.


When I knitted Donovan B. Bear his first hand-knit sweater (an Irish Fisherman style sweater, done traditionally from the neck down), I found it difficult to work a teddy-bear-sized sleeve in the round over those four or five needles. The stitches would become stretched, and the long ends of the needles got in the way of the work. I ended up having to use six or eight needles to work the small, narrow sleeves.

Magic Loop

Magic Loop is a circular-needle technique that, for many people, replaces double-pointed needles. Instead of rotating through free and stitch-holding needles, one uses a single, long-cable circular needle, keeps a few stitches on the needles but leaves most on the cable, and pulls out the cable between stitches to create a comfortable knitting space. YouTube demonstrations show this method working with as few as four stitches.


The biggest advantage to Magic Loop, as far as I can tell, is that it's easier to pack up your knitting and go: just slide all your stitches onto the cable, and slide them back onto the needles when you are ready to pick up again. (This is also one of the reasons circular and flexible needles are becoming popular for flat knitting: tip protectors can come off, allowing stitches to fall off a loaded needle, and one can't always complete a row or round when knitting on a train or bus, or at a Ravelry group meeting.) With double-pointed needles, there's a much greater chance your work will slide off a needle and require you to back-track.

Advantages to Magic Loop

  • Today, it's a lot easier to find circular knitting needles in a given size than it is to find dpns
  • The ends of non-active double-pointed needles can get in the way working with your active needles
  • Unless they come with an organizing sleeve, it's harder to keep a set of dpns together — and when they come apart, you need a needle size gauge to be able to figure out what size a needle is, or to put together a set from all of the random dpns in the bottom of your needle drawer. (That said, many circular needles don't have the size printed on them, either, and if you lose their packaging...)

Despite those advantages, for the most part I hate Magic Loop. 

Advantages to Double-Pointed Needles

  • I feel that Magic Loop distorts my knitting and forces a looser knit, especially on the fine yarns (such as sock yarns) for which it is usually used.
  • I feel like I'm spending all my time slipping stitches onto and off of the needles and cables, rather than actually knitting
  • Slipping the cable loop out between small, tight stitches aggravates the tendinitis in my hands (although part of that might be a stiffer-than-ideal cable)
  • If I need to slip out the cable loop where it meets the needle, or bend the cable at that join, I fear that the stress on the connection will lead to needle failure

It Depends on You, and on the Project

Because I was moving between (and trying out) various needle sizes (and the yarn kept sliding off my dpns), I ended up doing my fisherman's rib cap using Magic Loop and and interchangeable needles. On the bulky yarn, it wasn't too bad. But right now, I'm working on some handwarmers, and Magic Loop has been a Magic Pain. Switching back to dpns is saving the project.