Just because #IWorkAtMichaels doesn't mean I have input to any of the projects you'll find on our website. While I do get advance access to our classroom projects, the instructions are already done and dusted by the time we get them.
That said, large companies such as Michaels and Wilton still move at the speed of print.
By that, I mean that product and project development cycles can run on the order of months or years, between identifying trends and their "stickiness" (projected life cycles), product design, prototyping, manufacturing tool-ups, packaging, marketing, and distribution. (When I was a teenaged member of the Girl Scouts' American Girl magazine's Editorial Advisory Board, we learned that the content of each issue was planned a year in advance, giving the editors time to line up experts, writers, and photographers, go through several rounds of copyediting and layout editing, getting the photography and graphics correct, and adding in reader contributions to fill the space to create the glossy magazine we looked forward to receiving in our mailboxes each month. View some of those vintage covers here.)
While electronic tools have sped up the writing and proofreading process to the point where many bloggers can post something daily, collaborative efforts that require research, beta testing, and/or technical copyediting still take time — and if you're publishing thousands of new pages (or updates) daily, some errors are bound to slip through.
When it comes to our in-store classes, I'll pre-read the Leader's Guide, figure if something's wrong or missing, and correct — even on-the-fly if we're missing one or more supplies, if a student wants to customize a project, or if an instruction step is missing. This is one of my strengths as an instructor.
Projects that originate on the website are another story. We only see them if we click through to the project. Today's email linked to a project whose supply list missed one of the necessary tools. I ended up using the customer service chat option to get the error submitted for correction.
All of us want our readers, students, and customers to be successful replicating the projects we post, and personalizing them for their own tastes and needs. The beauty of electronic publication means we can accept comments and error messages, and we can post-edit published pages to improve our users' success rates.
Thursday, August 16, 2018


Sunday, August 5, 2018
Keeping Track of Hooks and Needles
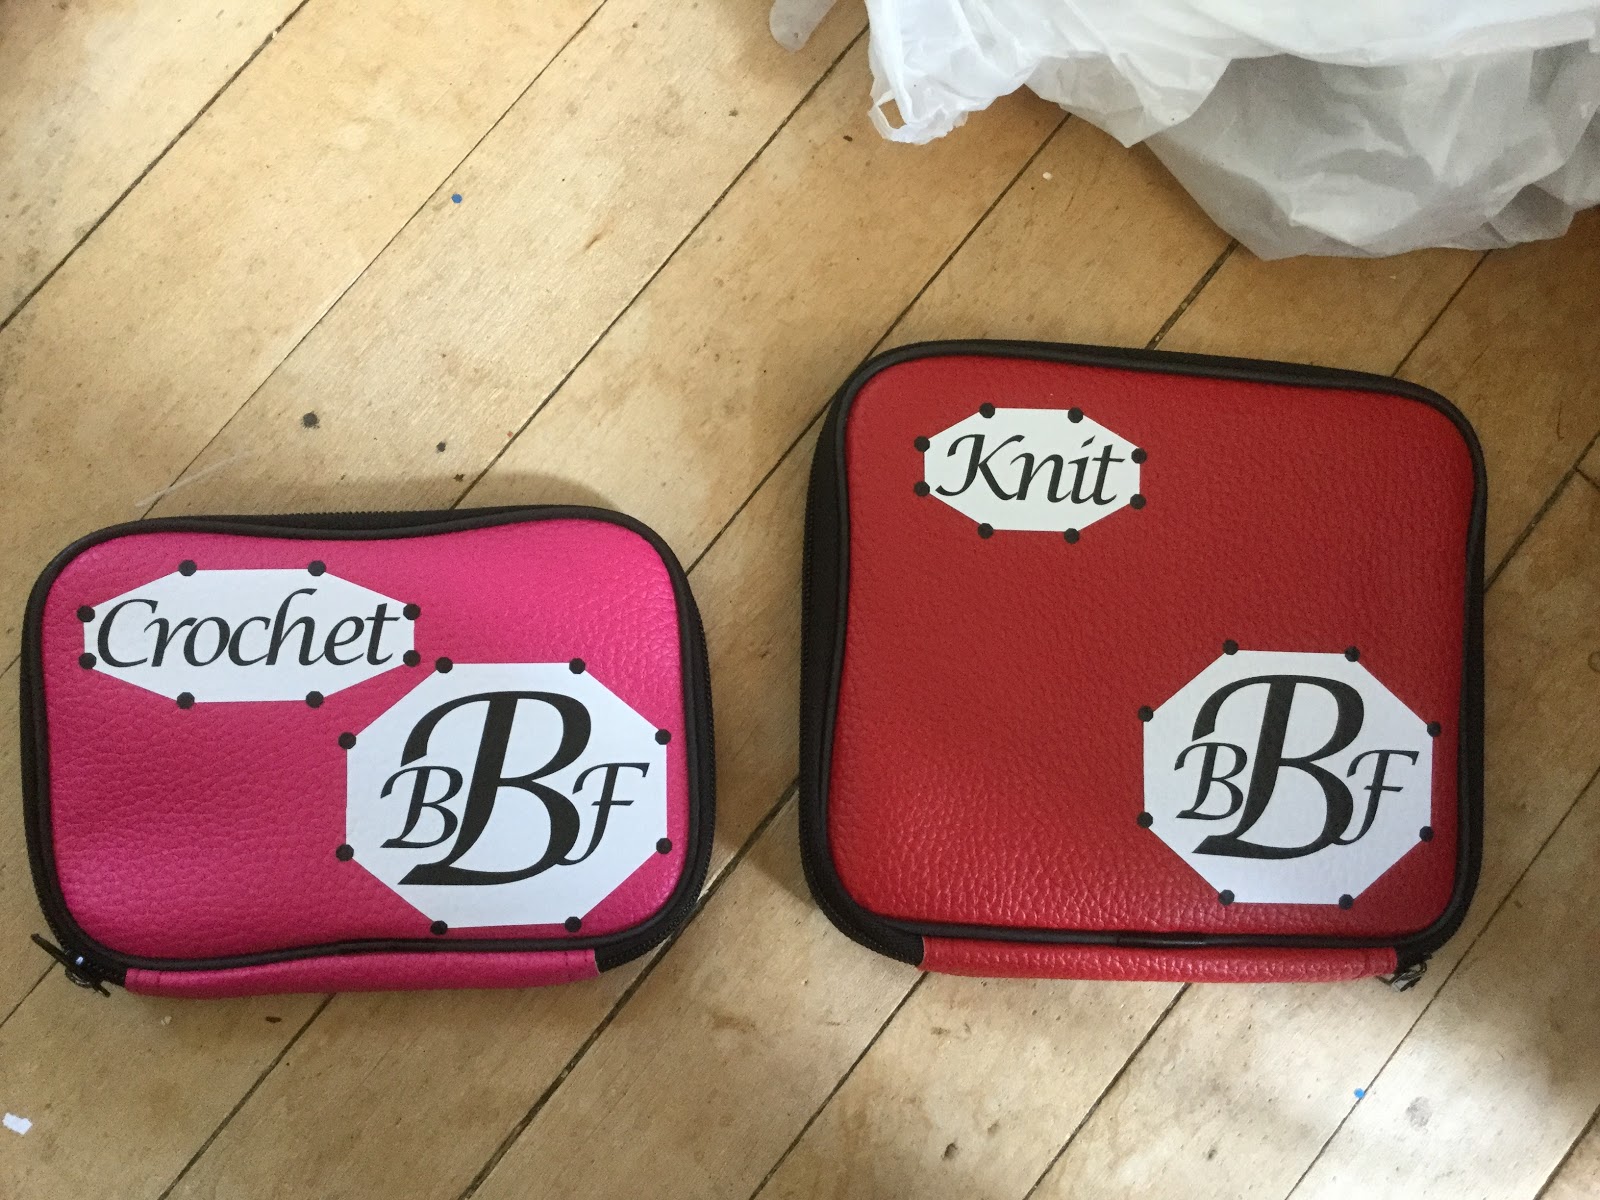
A couple of months ago, I finally purchased a Loops & Threads case in which to store as many and diverse a set as possible of my loose crochet hooks. (I have a complete set of Boye steel crochet hooks, 00 to 14, in their own case, as well as a number of duplicates in the 12 to 14 range because they sometimes bend out of shape.) The Loops & Threads case has one side sized for steel hooks, and the other for aluminum hooks. With space for 10 aluminum hooks and 15 steel hooks, something has to give in terms of completeness. The oversized plastic hooks (sizes P and up) are obviously the first to go — but I rarely use them to begin with, and they're too big to get lost easily. But the collection of hooks I have in that case is not really the issue here...
The real issue is that the size of the hot pink, textured faux-leather zip-around case is not all that much smaller than the red, textured faux-leather zip-around case that holds my Loops & Threads set of circular knitting needles, with the result that the two get easily confused in low light (or when I'm "looking" with my hands rather than my eyes, which is frequently the case).
 I decided to take advantage of my Cricut to mongram and label the two cases and (hopefully) avoid future confusion.
That said, most of us seamstresses and yarnies could really use better organization for our collections of hooks, Tunisian hooks, needles, circular needles, double-pointed needles, yarn needles, tatting shuttles, doll needles, tapestry needles, embroidery needles, and sewing needles... Especially when we have our own collections as well as those we've "inherited" from friends, relatives, and foremothers.
The real issue is that the size of the hot pink, textured faux-leather zip-around case is not all that much smaller than the red, textured faux-leather zip-around case that holds my Loops & Threads set of circular knitting needles, with the result that the two get easily confused in low light (or when I'm "looking" with my hands rather than my eyes, which is frequently the case).
 |  |
Thursday, August 2, 2018
Is it really an EASY Press?
On Friday, July 27, Michaels stores across the country demonstrated the Cricut EasyPress for the nation's teachers.

As a home sewer and occasional iron-on-t-shirt maker, the EasyPress has been an interesting product to watch — although not necessarily one I really need. That said, our in-house guide said that the demonstrator should be an expert at the EasyPress so she can answer teachers' questions. So, I took a few hours the day before the event to familiarize myself with the EasyPress machine and its accessory EasyPress mat.
I came prepared with pre-cut designs for a couple of T-shirts, using several different types of Cricut and Siser heat transfer vinyls (aka "iron-ons") as well as a fabric iron-on and some fabric to which I'd previously applied HeatnBond® Ultrahold, my stocks of HeatnBond® Lite and HeatnBond® UltraHold, a few T-shirts, a baseball cap, my tailor's ham, my Quilter's Cut 'n Press and some scraps of polyester and linen, as well as a few rolls of various types of HTV (heat transfer vinyl) and scraps from my cuttings and weedings.
The EasyPress has a square sole plate with rounded corners, rather than the somewhat shoe-shaped standard household iron. As a presser, it has no vents — which means it heats more evenly (no more steam-hole marks in your ironing). Its larger area means it can potentially press larger, flat pieces of fabric more rapidly than an iron. It comes with a sample project: a glitter iron-on teacup and a 4" x 4" piece of canvas fabric.
The EasyPress is heavier than a regular iron, but that should mean you can just set it down on your iron-on. It seems to do OK that way for basic ironing, but it still left shadow creases in my cotton and linen samples. That's probably because linen and cotton usually require steam pressing, but the EasyPress is designed around keeping one's work as moisture-free as possible.
The size and weight of the EasyPress make it difficult to maneuver around curved pieces; the logo I tried to iron on a hat never managed to "take" correctly, and I ended pulling it off.
While the EasyPress might be useful for sheer cafe curtains, I wouldn't chuck my home iron for it.

Placed on a hard table, the EasyPress Mat is about as stiff as a padded ironing board, and not nearly as stiff as the padded side of the Cut 'n Press. The fluffiness of the mat is one reason most iron-ons require the user to press down on the EasyPress.
While the charts suggest temperatures as low as 185F for delicate fabrics such as silk, and times as low as 10-15 seconds, the average iron-on appears to require 30 seconds at 340F — and as it turns out, the higher temperature didn't seem to harm either my polyester sample or vinyl-on-vinyl layering.
My other tests were: reflective HTV on canvas (took a lot of time) and on a t-shirt, regular and metallic HTV on a t-shirt; two varieties of HeatnBond on cotton, welded onto black linen; scraps of regular, metallic, and glitter HTV on linen, and regular HTV on polyester. No matter the heat setting or the amount of time, nothing seemed to burn, char, or do something else. That said, if I forgot to press the countdown button, or wait for the press to come up to temperature, and accidentally laid the press down on a sample, it held fast to the linen fabric when I removed the iron two or three seconds later and the Siser and Cricut carriers even peeled nicely!
Thoughts
The EasyPress is a fun and easy way to add "iron-ons" to T-shirts, towels, and any surface that can be kept flat and wrinkle free. It's $149.99 price is comparable to a high-end iron, but you don't get the options of steam, spray, vertical steam, and/or cordless operation that those irons provide (and its cord does get in the way), so it's more of a companion tool than a replacement for your trusty household iron. That said, if you do a lot of iron-on, the amount of time it will save you might be well worth the price.
While I work for Michaels, my thoughts on the EasyPress are my own.
As a home sewer and occasional iron-on-t-shirt maker, the EasyPress has been an interesting product to watch — although not necessarily one I really need. That said, our in-house guide said that the demonstrator should be an expert at the EasyPress so she can answer teachers' questions. So, I took a few hours the day before the event to familiarize myself with the EasyPress machine and its accessory EasyPress mat.
I came prepared with pre-cut designs for a couple of T-shirts, using several different types of Cricut and Siser heat transfer vinyls (aka "iron-ons") as well as a fabric iron-on and some fabric to which I'd previously applied HeatnBond® Ultrahold, my stocks of HeatnBond® Lite and HeatnBond® UltraHold, a few T-shirts, a baseball cap, my tailor's ham, my Quilter's Cut 'n Press and some scraps of polyester and linen, as well as a few rolls of various types of HTV (heat transfer vinyl) and scraps from my cuttings and weedings.
EasyPress Versus the Iron
My iron is still from the days where there's a dial setting that goes Low (Acrylic/Silk/Nylon), Medium Low (Polyester), Medium (Wool), Medium High (Cotton), and High (Linen), with steam options not kicking in until you get at least up to Medium heat. I've done enough burn tests on scraps to know what burnt silk, polyester, wool, cotton, and linen look like and smell like. That said, I didn't know how the EasyPress's maximum setting of 360° compares until I looked it up just now. [Update: on July 30, Cricut announced the Easy Press 2, which will debut Fall 2018. It will come in three sizes and heat up to 400°.] I do know that some customers have returned the EasyPress because it doesn't get hot enough for their needs — which is why I brought along both cotton and linen samples, which generally require the highest heat to press.The EasyPress has a square sole plate with rounded corners, rather than the somewhat shoe-shaped standard household iron. As a presser, it has no vents — which means it heats more evenly (no more steam-hole marks in your ironing). Its larger area means it can potentially press larger, flat pieces of fabric more rapidly than an iron. It comes with a sample project: a glitter iron-on teacup and a 4" x 4" piece of canvas fabric.
The EasyPress is heavier than a regular iron, but that should mean you can just set it down on your iron-on. It seems to do OK that way for basic ironing, but it still left shadow creases in my cotton and linen samples. That's probably because linen and cotton usually require steam pressing, but the EasyPress is designed around keeping one's work as moisture-free as possible.
The size and weight of the EasyPress make it difficult to maneuver around curved pieces; the logo I tried to iron on a hat never managed to "take" correctly, and I ended pulling it off.
While the EasyPress might be useful for sheer cafe curtains, I wouldn't chuck my home iron for it.
The EasyPress Mat
The 12" x 12" EasyPress Mat we were given is just a little bit larger than the EasyPress, enough to lay out the design area of an average meant-to-be-tucked-in adult t-shirt, and about the same size as my 12" x 12" Cut 'n Press. (Both 8" x 10" and 16" x 20" EasyPress mats are also available.) Continuing with the "as dry as possible" meme, the mat includes a heat-reflecting inner layer as well as a moisture wicking layer. The mat is flexible and could be rolled if needed.
Placed on a hard table, the EasyPress Mat is about as stiff as a padded ironing board, and not nearly as stiff as the padded side of the Cut 'n Press. The fluffiness of the mat is one reason most iron-ons require the user to press down on the EasyPress.
Setting Up the EasyPress
The EasyPress comes with a quick reference card of settings for the time and temperature needed to adhere different types of iron-on to different types of fabrics and non-fabric surfaces; a more complete chart is available on the website. No matter where you set it last, the EasyPress turns on to a default setting of 250F with a 30-second timer. You press the temperature or time button and the up-and-down arrows to set your temperature between 150 and 360F, and your time between 1 and 300 seconds (5 minutes). The device has a safety timer which will shut it down after 10 minutes of non-use.While the charts suggest temperatures as low as 185F for delicate fabrics such as silk, and times as low as 10-15 seconds, the average iron-on appears to require 30 seconds at 340F — and as it turns out, the higher temperature didn't seem to harm either my polyester sample or vinyl-on-vinyl layering.
Testing
As noted earlier, my iron-on fabric did not adhere well to my baseball cap. It was fine on one of my t-shirts, though. I'm pretty sure the hat's curvature had a lot to do with that.My other tests were: reflective HTV on canvas (took a lot of time) and on a t-shirt, regular and metallic HTV on a t-shirt; two varieties of HeatnBond on cotton, welded onto black linen; scraps of regular, metallic, and glitter HTV on linen, and regular HTV on polyester. No matter the heat setting or the amount of time, nothing seemed to burn, char, or do something else. That said, if I forgot to press the countdown button, or wait for the press to come up to temperature, and accidentally laid the press down on a sample, it held fast to the linen fabric when I removed the iron two or three seconds later and the Siser and Cricut carriers even peeled nicely!
Thoughts
The EasyPress is a fun and easy way to add "iron-ons" to T-shirts, towels, and any surface that can be kept flat and wrinkle free. It's $149.99 price is comparable to a high-end iron, but you don't get the options of steam, spray, vertical steam, and/or cordless operation that those irons provide (and its cord does get in the way), so it's more of a companion tool than a replacement for your trusty household iron. That said, if you do a lot of iron-on, the amount of time it will save you might be well worth the price.
While I work for Michaels, my thoughts on the EasyPress are my own.
Monday, July 30, 2018
It Still Doesn't Register...
Registration: the alignment of multiple processing passes on the same sheet of paper, so a single multicolor or multiprocess image is produced.
Coming from the world of photography and printing, I see perfect registration as a requirement to make sure my images and cut works line up so there's no offset of one color to another, or of image to cut. It's something I expect of any color printer — and which, until now, I expected to be standard for any cutting machine. If I have to manually align a paper for multiple passes, I'll set my program to print the registration marks which allow me to perform the alignment myself.
One of the issues I've been having with getting my Cricut to do what I want it to is its inconsistency in registering to the same spot on its cuttting mat, or — more importantly — to the material on the cutting mat. This is annoying because it makes it difficult to do precision cuts on unusual shapes, and to do registered cuts on preprinted materials — such as personalized cupcake wrappers and flags for an event.
Cricut's Design Space has a "print and cut" feature which is supposed to make this sort of thing easy: print your design out onto an appropriate paper through Design Space, which adds registration marks to your graphics, and then cuts out the intricate shapes of your printed item.
There are some problems with this:
1. The maximum size of a print-and-cut graphic is about 9" x 6", which is nowhere near the size of the standard cutting mat, and a bit small for adult t-shirts.
2. The "print" part of print-and-cut is much too low a resolution to be useful
3. The "cut" part of print-and-cut either tries to cut out every single color change, causing the knife to shred the project, or only cuts the outlines of the printed portion (as if you were making a sticker), with no obvious option for anything different.
DIY'ing the sequence isn't much better. While you can print and adjust to the entire size of the sheet, the cutting will end up in different areas from one mat feed to the next. A few YouTubers have suggested that adding a bounding box at the edges of your image (or paper) will help with registration, but I've not found it a perfect match.
That said, there's one additional step that looks like it might help (though it may "ruin" a mat): I ran an old mat through the Cricut several times with the bounding box set to "write" and found that my Cricut has a specific offset for 11 x 8.5" paper and cardstock (US standard letter size paper, matted landscape). If I set my letter-sized paper to the marks I've made on the mat, I'm getting something closer to a usable registration, if not what I would consider acceptable registration.
Note that the bounding lines on the flags and some of the wrappers are visible, and how they vary from cupcake to cupcake.
On the plus side, after a lot of trial and error (and wasted cardstock), I got the Cricut to cut everything out without mangling the pre-printed images. On the minus side, I still had those outline marks. Since this was a bit of a test project, I went with the stock I managed to print out. For future events, I can "hide" the outline layer so it won't print, and my cupcake flags and wrappers should be perfect.
Coming from the world of photography and printing, I see perfect registration as a requirement to make sure my images and cut works line up so there's no offset of one color to another, or of image to cut. It's something I expect of any color printer — and which, until now, I expected to be standard for any cutting machine. If I have to manually align a paper for multiple passes, I'll set my program to print the registration marks which allow me to perform the alignment myself.
One of the issues I've been having with getting my Cricut to do what I want it to is its inconsistency in registering to the same spot on its cuttting mat, or — more importantly — to the material on the cutting mat. This is annoying because it makes it difficult to do precision cuts on unusual shapes, and to do registered cuts on preprinted materials — such as personalized cupcake wrappers and flags for an event.
 |
| Cupcake flag and wrapper for New Jersey Libertarian Party event |
Cricut's Design Space has a "print and cut" feature which is supposed to make this sort of thing easy: print your design out onto an appropriate paper through Design Space, which adds registration marks to your graphics, and then cuts out the intricate shapes of your printed item.
There are some problems with this:
1. The maximum size of a print-and-cut graphic is about 9" x 6", which is nowhere near the size of the standard cutting mat, and a bit small for adult t-shirts.
2. The "print" part of print-and-cut is much too low a resolution to be useful
3. The "cut" part of print-and-cut either tries to cut out every single color change, causing the knife to shred the project, or only cuts the outlines of the printed portion (as if you were making a sticker), with no obvious option for anything different.
DIY'ing the sequence isn't much better. While you can print and adjust to the entire size of the sheet, the cutting will end up in different areas from one mat feed to the next. A few YouTubers have suggested that adding a bounding box at the edges of your image (or paper) will help with registration, but I've not found it a perfect match.
 |
| The red rectangle is my Cricut's DIY "registration" marks for US letter-size paper |
 |
| Registration Errors |
On the plus side, after a lot of trial and error (and wasted cardstock), I got the Cricut to cut everything out without mangling the pre-printed images. On the minus side, I still had those outline marks. Since this was a bit of a test project, I went with the stock I managed to print out. For future events, I can "hide" the outline layer so it won't print, and my cupcake flags and wrappers should be perfect.
Thursday, July 19, 2018
I Hear Cricuts...
If you spend any amount of time in a craft store or among paper crafters, you will hear them toss about words like Cuttlebug, Sizzix, Spellbinders, Silhouette, Cameo, and Cricut. Each of these are machines that help a crafter create precise embossed or cut shapes that can be assembled to make three-dimensional cards, scrapbook page accents, centerpieces and other specialized paper goods for special events, including custom favor boxes. A family with a couple of Cricut machines and a lot of time can save enough money creating their wedding, shower, or baby-naming supplies to pay for the cost of these expensive cutters and the amount of time it takes to learn how to use some of them.
Because I'm not into scrapbooking or planners, and I don't have children or nearby family, I don't have a direct need for these machines; however, many Michaels customers purchase consumables for them, and some even earn their incomes by using them. That means it's a good idea for me to understand how they work.
Our classroom includes a Sizzix Big Kick, a Cricut Expressions, and several dies and embossing folders for the Sizzix. The Sizzix is pretty straightforward: you put your paper on a plate, put your die on it, put another plate on top, and crank it through the machine. Then you take your pieces and assemble them.
The Cricut is another matter entirely. The Expressions model has a small number of built-in images and fonts, but mostly relies on proprietary data cartridges for your projects and designs. You use an awkwardly slow built-in display to try to lay these out in a way that either makes sense or wastes the least amount of consumable materials — or you can (or rather could) use a USB connection and a PC program (Cricut Craft Room) to try to manage things more quickly. Then you prepare your materials and tell the machine to do its work. Later Cricut models (the Explore series and the current top-of-the-line Maker) use different software (Cricut Design Space) that (hallelujah!) allows you to upload your own designs, rather than just relying on cartridges and whatever Cricut has made available through their online space.
It's that ability to do truly custom work that has had me interested in playing with the Cricut Explore series, and that past tense that has gotten me to finally purchase what, for me, is an expensive toy: Cricut shut down Craft Room on July 15. The nominal reasons for the shutdown is because the software is based on Adobe Flash, which is (1) insecure and (2) no longer supported by Adobe.
As part of the Craft Room sunset program, Cricut generously offered Craft Room users a significant credit towards purchasing a Design Space-compliant model, valid through July 15. I waited almost until the last minute before taking the leap and buying a Cricut Explore Air with a basic set of starter tools. Now, I'm working on translating some of the logos my organizations use into Design Space-friendly files and and trying out some ideas for custom decorations for our events.
Once I get the hang of the translations, I'll be able to see what sort of market might exist to give me some return on this investment...
Because I'm not into scrapbooking or planners, and I don't have children or nearby family, I don't have a direct need for these machines; however, many Michaels customers purchase consumables for them, and some even earn their incomes by using them. That means it's a good idea for me to understand how they work.
Our classroom includes a Sizzix Big Kick, a Cricut Expressions, and several dies and embossing folders for the Sizzix. The Sizzix is pretty straightforward: you put your paper on a plate, put your die on it, put another plate on top, and crank it through the machine. Then you take your pieces and assemble them.
The Cricut is another matter entirely. The Expressions model has a small number of built-in images and fonts, but mostly relies on proprietary data cartridges for your projects and designs. You use an awkwardly slow built-in display to try to lay these out in a way that either makes sense or wastes the least amount of consumable materials — or you can (or rather could) use a USB connection and a PC program (Cricut Craft Room) to try to manage things more quickly. Then you prepare your materials and tell the machine to do its work. Later Cricut models (the Explore series and the current top-of-the-line Maker) use different software (Cricut Design Space) that (hallelujah!) allows you to upload your own designs, rather than just relying on cartridges and whatever Cricut has made available through their online space.
It's that ability to do truly custom work that has had me interested in playing with the Cricut Explore series, and that past tense that has gotten me to finally purchase what, for me, is an expensive toy: Cricut shut down Craft Room on July 15. The nominal reasons for the shutdown is because the software is based on Adobe Flash, which is (1) insecure and (2) no longer supported by Adobe.
As part of the Craft Room sunset program, Cricut generously offered Craft Room users a significant credit towards purchasing a Design Space-compliant model, valid through July 15. I waited almost until the last minute before taking the leap and buying a Cricut Explore Air with a basic set of starter tools. Now, I'm working on translating some of the logos my organizations use into Design Space-friendly files and and trying out some ideas for custom decorations for our events.
Once I get the hang of the translations, I'll be able to see what sort of market might exist to give me some return on this investment...
Subscribe to:
Posts (Atom)